Help
Help
Get Instructions Here
TheVacationCalendar.com had the same pricing of $20 per year from its inception in 2007 through 2022. In 2022, we hired an amazing development firm to completely rebuild the site to bring it up to date with today’s standard websites. A single account can now manage rooms within a house, manage multiple rooms and continue to support as many users as needed. To offset the cost of the 30+ person development team as well as to cover other increasingly higher expenses, the site has a new pricing model.
| Price (billed Monthly) | Price (billed Annually) | |
|---|---|---|
| Basic | $5 | $40 |
| Standard | $7 | $60 |
| Premium | $9 | $80 |
| Trial Period | 7 days | 20 days |
| Functionality | Basic | Standard | Premium |
|---|---|---|---|
| Calendar | X | X | X |
| Bulletin Board | X | X | X |
| Blog | X | X | X |
| Photo Album | X | X | X |
| Local Guide | X | X | X |
| Food Items | X | X | X |
| Guest Book | X | X | X |
| Booking Rooms | - | Up to 6 rooms | Unlimited rooms |
| Additional Properties | - | - | Up to 9 properties |
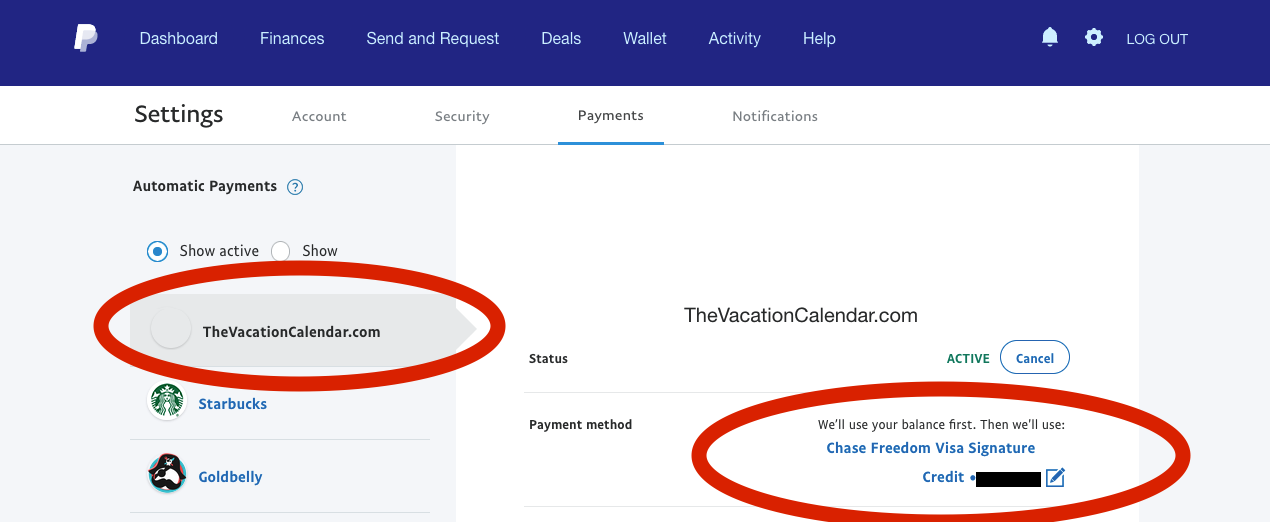
TheVacationCalendar.com relies on PayPal’s subscription capabilities. Keeping your payment information safe is of the utmost importance to us, so we use PayPal as they have best of breed security that we could never replicate.
Please note that having an up to date payment option in your PayPal account does not mean that your monthly/annual payment will be successfully processed. PayPal specifies a specific payment method to each automatic payment.
It is important to always have a valid payment method associated with the TheVacatioCalendar.com automatic payment. You can find this screen in PayPal by going to Settings —> Payments —> Automatic Payments .
Payment Timing
PayPal subscriptions will apply the automatic payment at the beginning of the payment cycle. So if you are paying for a year of service, the payment will be taken up front. Because of this, new subscribers have a trial period of 7 days for monthly payment and 20 days for annual payments so that users can be sure the site meets their needs.
Upgrading & Downgrading
Upgrading or downgrading a subscription will immediately cancel your existing subscription and create a new subscription. Users will receive a free trial of 7 days for monthly subscriptions and 20 days for yearly subscriptions. You will be charged the new rate at the end of the trial period. If you upgrade or downgrade a yearly subscription causing you to lose an unused portion of the prior subscription, please email support@thevcationcalendar.com and a prorated refund will be provided for the remainder of the initial subscription that was not used. The refund will be made within 14 days after the initial payment is made for the new subscription per the refund schedule below. Unfortunately, PayPal does not support this process so it will be handled manually.
| Current Subscription | Upgrade/Downgrade 1 Tier | Price Upgrade/Downgrade 2 Tiers |
|---|---|---|
| In 1st Month | $20 | $40 |
| In 2nd Month | $18 | $36 |
| In 3rd Month | $16 | $32 |
| In 4th Month | $14 | $28 |
| In 5th Month | $12 | $24 |
| In 6th Month | $10 | $20 |
| In 7th Month | $8 | $16 |
| In 8th Month | $6 | $12 |
| In 9th Month | $4 | $8 |
| In 10th Month | $2 | $4 |
| In 11th Month | No refund | No refund |
| In 12th Month | No refund | No refund |
Cancelling
PayPal does not support the ability to cancel subscription at the end of an active payment cycle. We hope that they will add this feature at some point, but for now, if you cancel your subscription, the cancellation will immediately take effect. If your intention is to use the site through the end of your current payment cycle, simply add a reminder to your calendar to cancel the subscription closer to the end of your payment cycle
Refund Schedule
Please email support@thevcationcalendar.com and a prorated refund will be provided for the remainder of the initial subscription that was not used. The refund will be made within 14 days after the initial payment is made for the new subscription per the refund schedule.
Here are the steps to quickly get your house up and running quickly. For a more thorough understanding of the website please go to the Detailed Instructions which provides instructions both written and in short videos so you can understand how all the features work.
Set up administrator capabilities
Start by going to the Admin page from the top navigation. This gives you access to all the features and the settings pages. Expand the Settings menu option on the left navigation and go to Account Information. Here you have several configuration options, but to start if you, as an administrator, also want to be able to schedule vacations as an owner. If you do, simply toggle the "Allow Administrator to have Owner permissions" toggle.
Create additional users for your house
Also under Settings is the Users screen which you use to create additional Owners by assigning them usernames and passwords. These users will be able to schedule vacations and add content to the house such as adding photos, blog entries, local guides, etc. You can also update your Guest password here. And, if you want to share the Administrator responsibilities with someone else, you can set up additional Administrators who will have full control of the site.
Set up the bulletin board
Only the Administrator can add content to the bulletin board. The bulletin board setup page is also on the left hand navigation menu under the Admin section. This is the perfect spot to put house rules, list important contact information, share the Wifi password, provide directions to the house, etc.
Create Photo Albums
If you would like to have your Photo Albums well organized, you can set these up in the Photo Albums page on the left hand navigation menu under the Admin section. Maybe you want to organize your photos by year, or by family event, or whatever. Setting these up ahead of time will help keep it nice and organized.
Set up Categories
If you like things well organized, you can add categories to Blog Entries, Local Guide and the Bulletin Board. Only the Administrator can create these categories and it will allow your users to quickly filter down these sections to the content they are looking for.
Tell your friends
Feel free to share the name of your vacation home and the guest password to as many people as you like. This will give them basic access to see the calendar and the memories you are saving for your ski house, beach house, lake house, mountain house, or whatever vacation home you have.
Learn about and request new features
We primarily share new features on Facebook but also use other social media sites. Follow us on our Facebook page to stay up to date and contribute to our growing community of users. Please use the Contact Us form to suggest new features or request help if something is not working the way you expected.
Here are the steps to take advantage of your shared vacation home. This site provides you with a lot more capabilities than just having a shared calendar for your vacation home. TheVacationCalendar.com allows you to capture and share memories. For a more thorough understanding of the website please go to the Detailed Instructions which provides instructions both written and in short videos so you can understand how all the features work.
Schedule a vacation
Use the Calendar page from the top navigation to schedule a vacation. If you can come to an agreement with your family on who uses each color, you can easily color code your calendar.
Share Photos
Use the Photo Album page to add photos of some of the wonderful times you had at your shared vacation home. Whether it is a shared beach house or shared ski house or what ever shared vacation home you have, you are probably capturing tons of great memories on your phone. Upload some of these to the Photo Album to share with friends and family.
Add Local Guide entries
Did you have an amazing dinner last night at a nearby restaurant? Or did you take a fun tour that you highly recommend? Use the Local Guide page from the top navigation to add an entry into your Local Guide where you can share the dinner or tour or whatever to other people who enjoy your vacation home.
Add to the Guest Book
Ever left a note in the guest book at a bed and breakfast or boutique hotel. Today this is done online. Go to the Guest Book page in the top navigation and leave a note for the owner and add a selfie so they can have a history of all the guests that have come and enjoyed their vacation home.
Share a story in the House Blog
Did something hysterical happen or did you have a great adventure one day? Capture the memory for others to share by adding a blog entry with pictures and details about what happened. This is a fun way to capture some of the memories that happen in your vacation home.
Learn about and request new features
We primarily share new features on Facebook but also use other social media sites. Follow us on our Facebook page to stay up to date and contribute to our growing community of users. Please use the Contact Us form to suggest new features or request help if something is not working the way you expected.
TheVacationCalendar.com has three different types of users that can access the website.
Administrator
The Administrator is set up during the initial setup of a new vacation home on the website. This user is responsible for configuring the site to match your vacation home. This user has many important functions shown below with some of the most important being creating additional users and maintaining the House Bulletin Board with useful information. Administrator with Owner Privileges By checking the "Allow Administrator to have Owner permissions" checkbox and clicking the Update button on the Administrator's manage account screen, an Administrator can have both administrative capabilities and owner capabilities.
Administrator with Owner Privileges
By checking the "Allow Administrator to have Owner permissions" checkbox and clicking the Update button on the Administrator's manage account screen, an Administrator can have both administrative capabilities and owner capabilities.
Owner:
An Owner is set up by the Administrator. As an Owner you can reserve time at the vacation house as long as the time does not overlap with any other scheduled vacations. You have the option to simply block off time when you are using the vacation home or you can go into more detail and specify who is going to use each room on any particular date. Owners can contribute to the house in many ways which are outlined below.
Guest
A single Guest account is set up during the initial setup of a new vacation home on the website however the password can be reset easily from the "manage account" screen. This is a generic password that allows users to view the activity on the website but cannot make any changes. You should feel free to send this password out to all of your friends and family who you want to be able to see who is using your vacation home. The Guest is able to click on a vacation and request to join or they can click on a date where the house is not being used to request to use the house. This will trigger an email to the appropriate individuals to determine whether to accommodate the request.
| Functions | Administrator | Administrator / Owner Privileges | Owner | Guest |
|---|---|---|---|---|
| Manage subscription | X | X | ||
| Create new users | X | X | ||
| Disable existing users | X | X | ||
| Reset other users’ passwords | X | X | ||
| Define rooms in house | X | X | ||
| Create additional properties | X | X | ||
| View audit history | X | X | ||
| View vacation on calendar | X | X | X | X |
| Create vacations on calendar | X | X | ||
| Edit vacations you created | X | X | ||
| Edit vacations anyone created | X | X | ||
| Delete vacations you created | X | X | ||
| Delete vacations anyone created | X | X | ||
| Request to join a vacation | X | X | X | X |
| Request to use vacation home | X | X | ||
| View bulletin board | X | X | X | X |
| Edit bulletin board | X | X | ||
| View blog entries | X | X | X | X |
| Like / comment on blog entries | X | X | X | X |
| Create blog entries | X | X | X | |
| Edit blog entries you created | X | X | X | |
| Edit blog entries anyone created | X | X | ||
| Delete blog entries you created | X | X | X | |
| Delete blog entries anyone created | X | X | ||
| View photo album | X | X | X | X |
| Create photo albums | X | X | ||
| Add photos | X | X | X | |
| Delete photos you added | X | X | X | |
| Delete photos anyone added | X | X | ||
| View local guide entries | X | X | X | X |
| Like / comment on local guide entries | X | X | X | X |
| Create local guide entries | X | X | X | |
| Edit local guide entries you created | X | X | X | |
| Edit local guide entries anyone created | X | X | ||
| Delete local guide entries you created | X | X | X | |
| Delete local guide entries anyone created | X | X | ||
| View food item lists | X | X | X | X |
| Edit food item lists | X | X | X | |
| View guest book entries | X | X | X | X |
| Add guest book entries | X | X | X | X |
| Approve guest book entries | X | X |
The Calendar screen allows you to view the vacations that are already scheduled for your vacation home. You can navigate month by month by clicking on the right and left arrows at the top of the calendar.
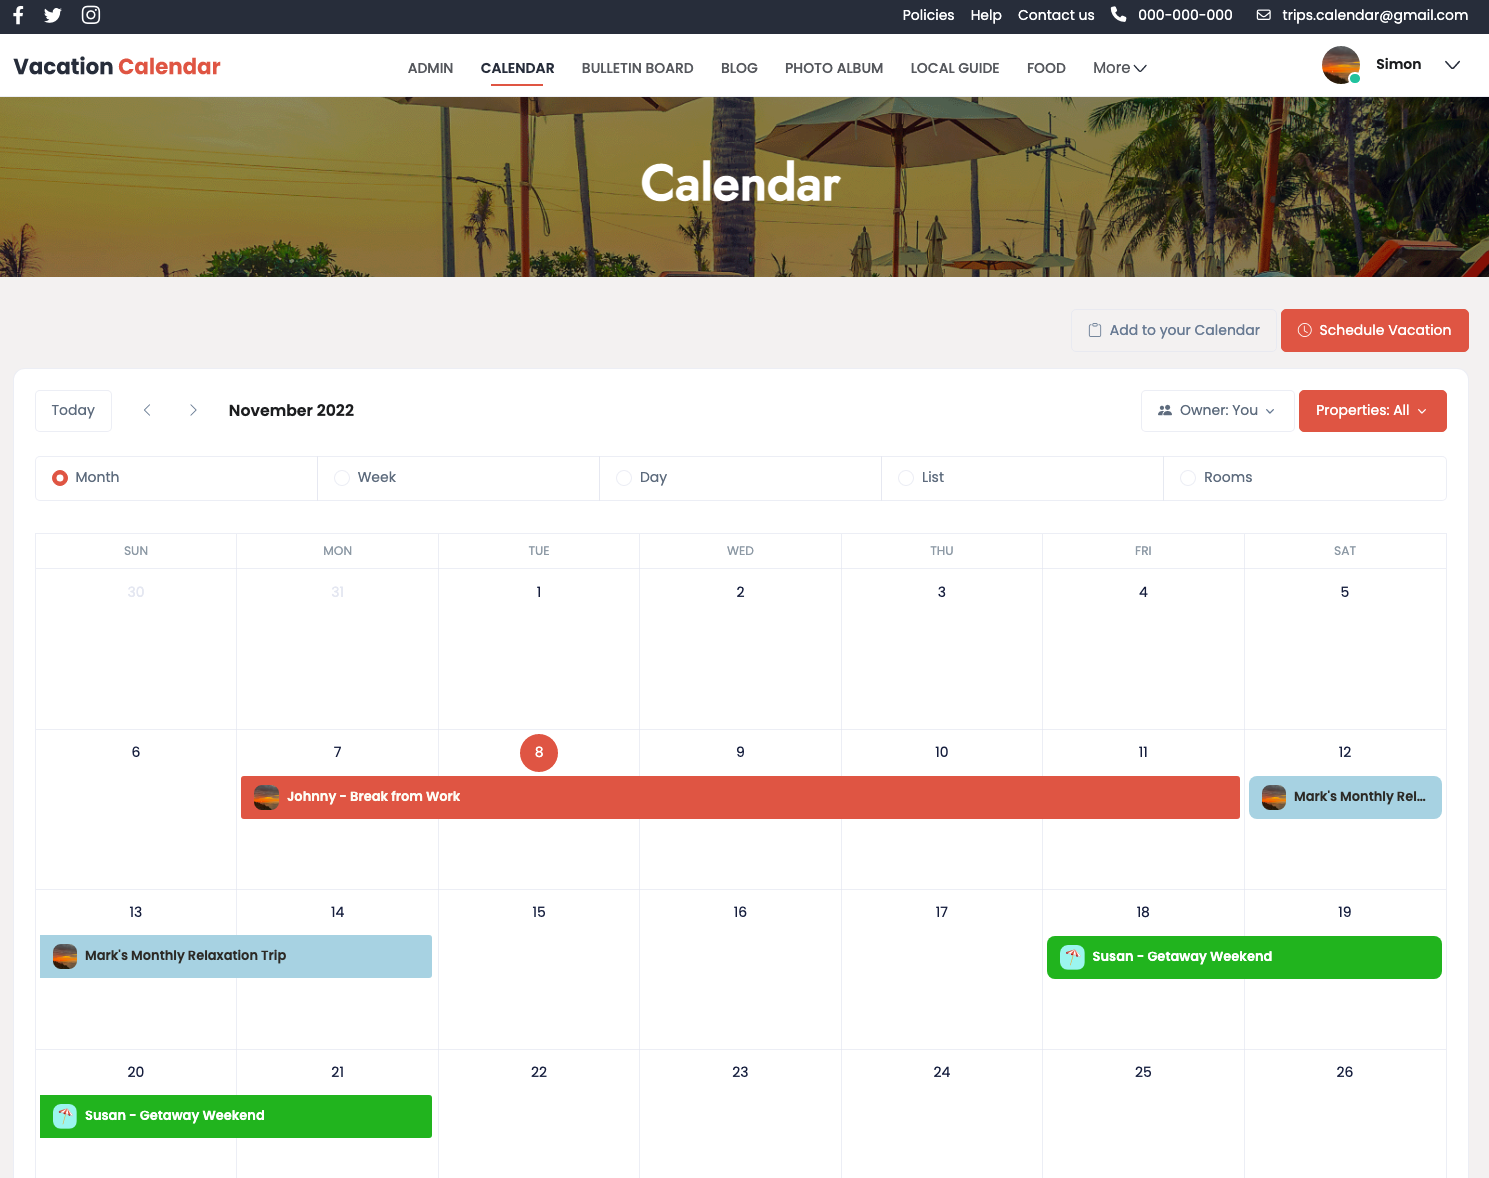
If someone else has already scheduled a vacation when you would like to use the vacation home, any user has the ability to “Request to Join” a vacation. Simply click on a vacation name that is a link and then fill out the information at the bottom of the next page to have TheVacationCalendar.com email the Owner who scheduled that vacation. To use the calendar to schedule a vacation, simply click on the first date that you are interested in and then specify the end date within the edit box that will appear. To edit or delete your vacation, simply click on any of the calendar days of your vacation and the edit box will appear so you can make any necessary changes. Don’t forget, Owners can only edit and delete the vacations they schedule. Administrators can edit and delete any and all vacations.
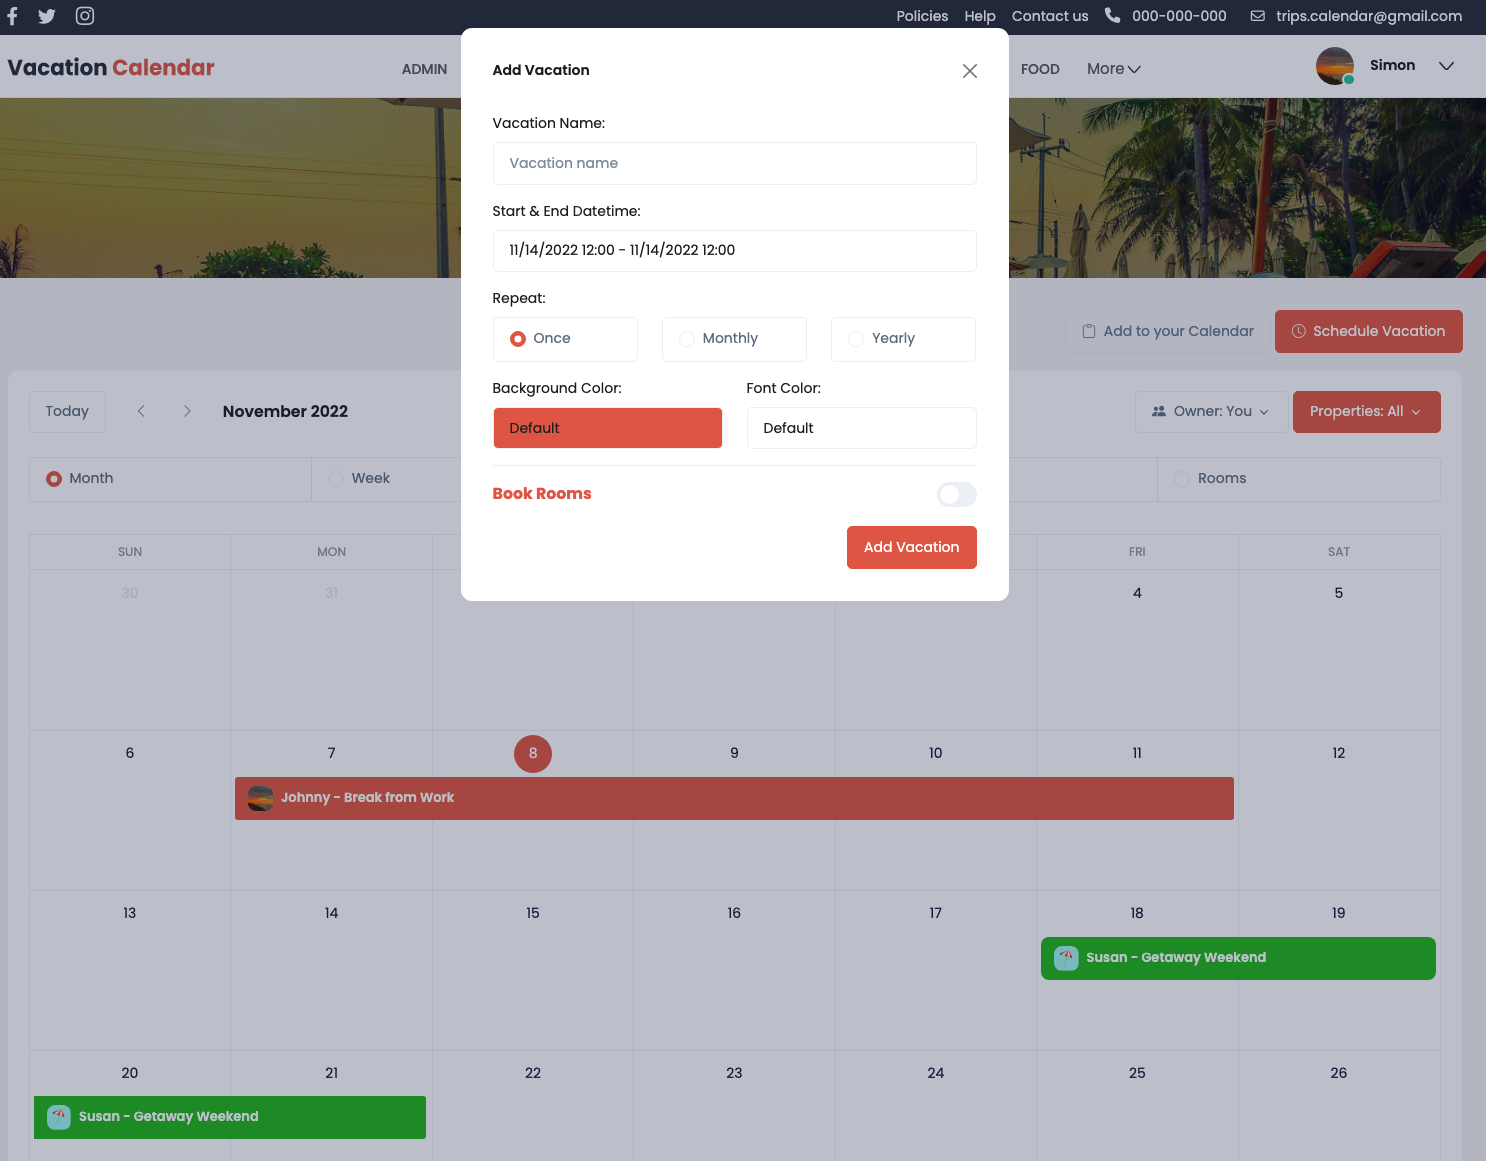
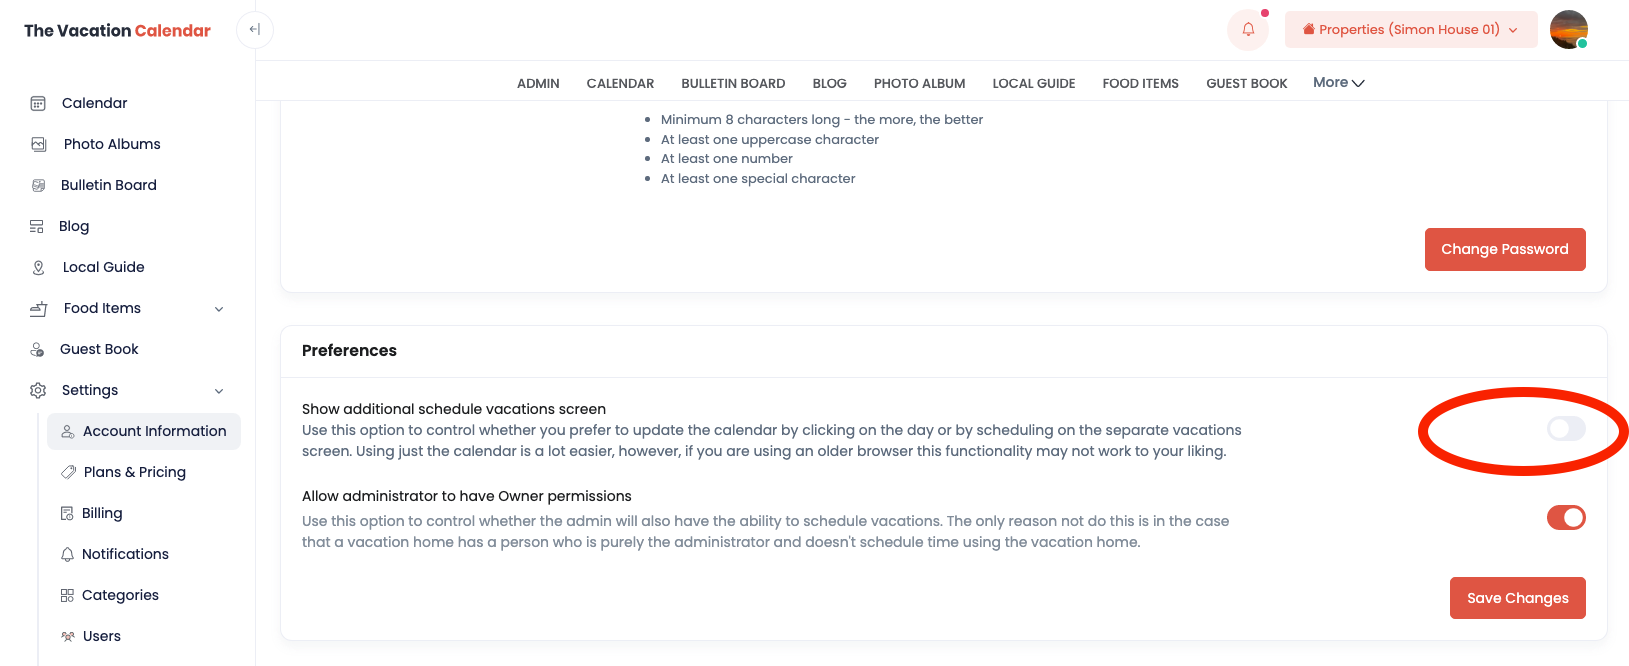
Every calendar entry needs a name that will be visible to all users. You also have the option to select various colors to easily identify your vacations. A new feature that has been added allows vacations to repeat on a monthly or annual basis. If you choose this option, you can specify how many times you want this vacation to repeat. Finally, if you have upgraded your home to the second tier, you have the ability to specify which rooms are occupied during your vacation. This makes it easier for friends and family to see if there is room to join you before they “Request to Join” your vacation. As an Administrator, you have even more control over the calendar. You have access to an administrative view where you can see all the vacation in a list where you can easily edit or delete them.
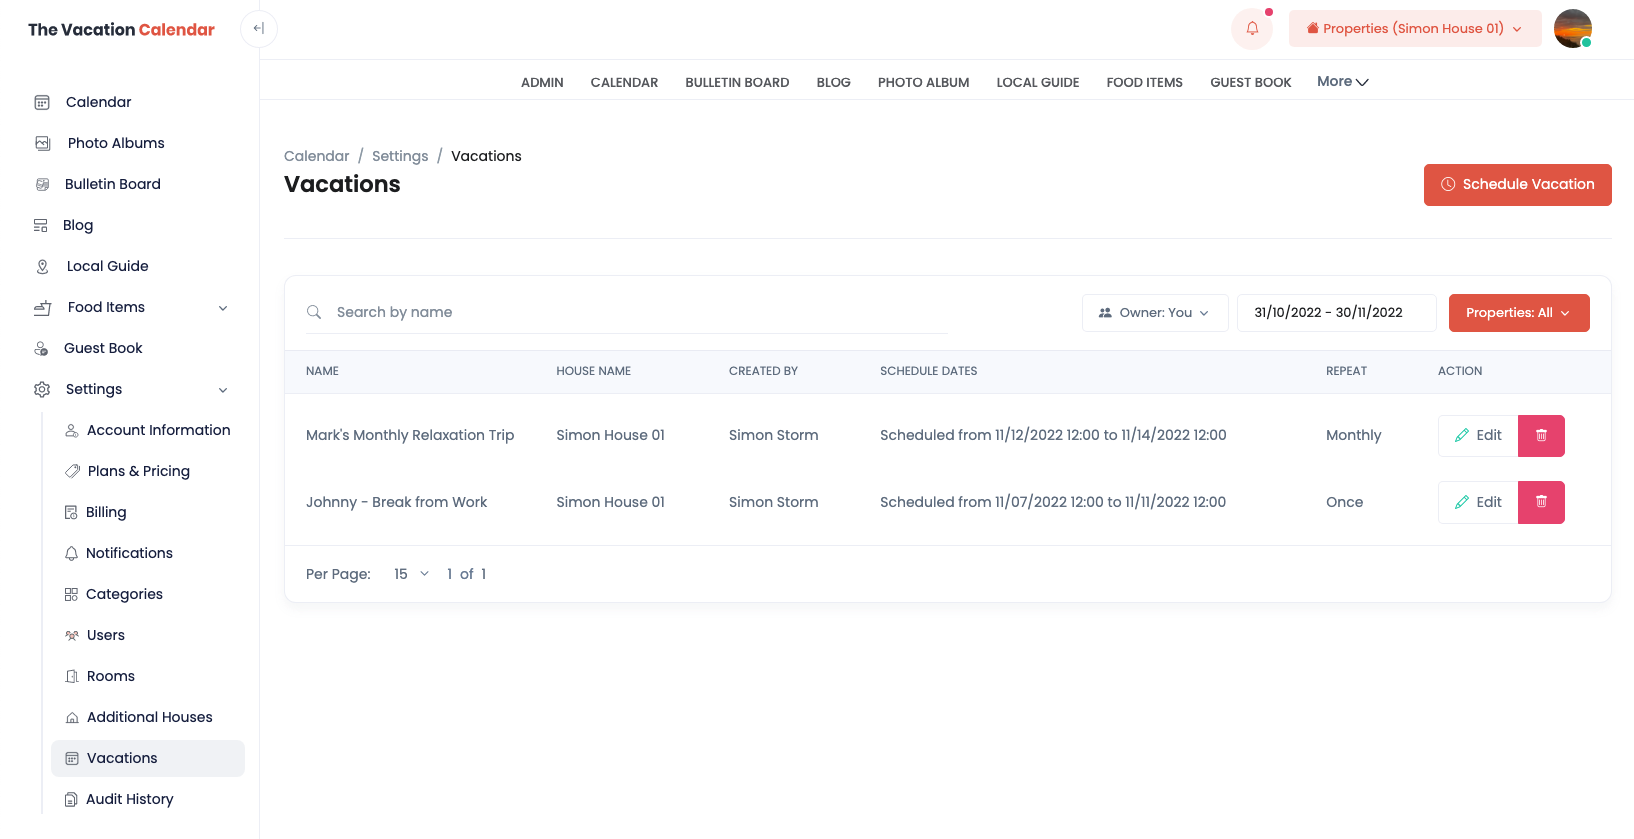
If you feel this additional view is not necessary, you can remove it from the left navigation by turning off the toggle in the Preferences section of the Account Information page.
The photo album is one of the most popular features (outside of the calendar) on the site. The newest version not only allows you to add photos, but you can add photo albums and even put albums inside other albums.
It is recommended to start by creating a few albums in the Admin section of the site. Here you can see all your albums. If an album is nested under another album, you will notice that the parent album column is populated with the parent album that the specific album resides within. You can edit and delete albums from this view, but please note the album has to be empty before you can delete it.

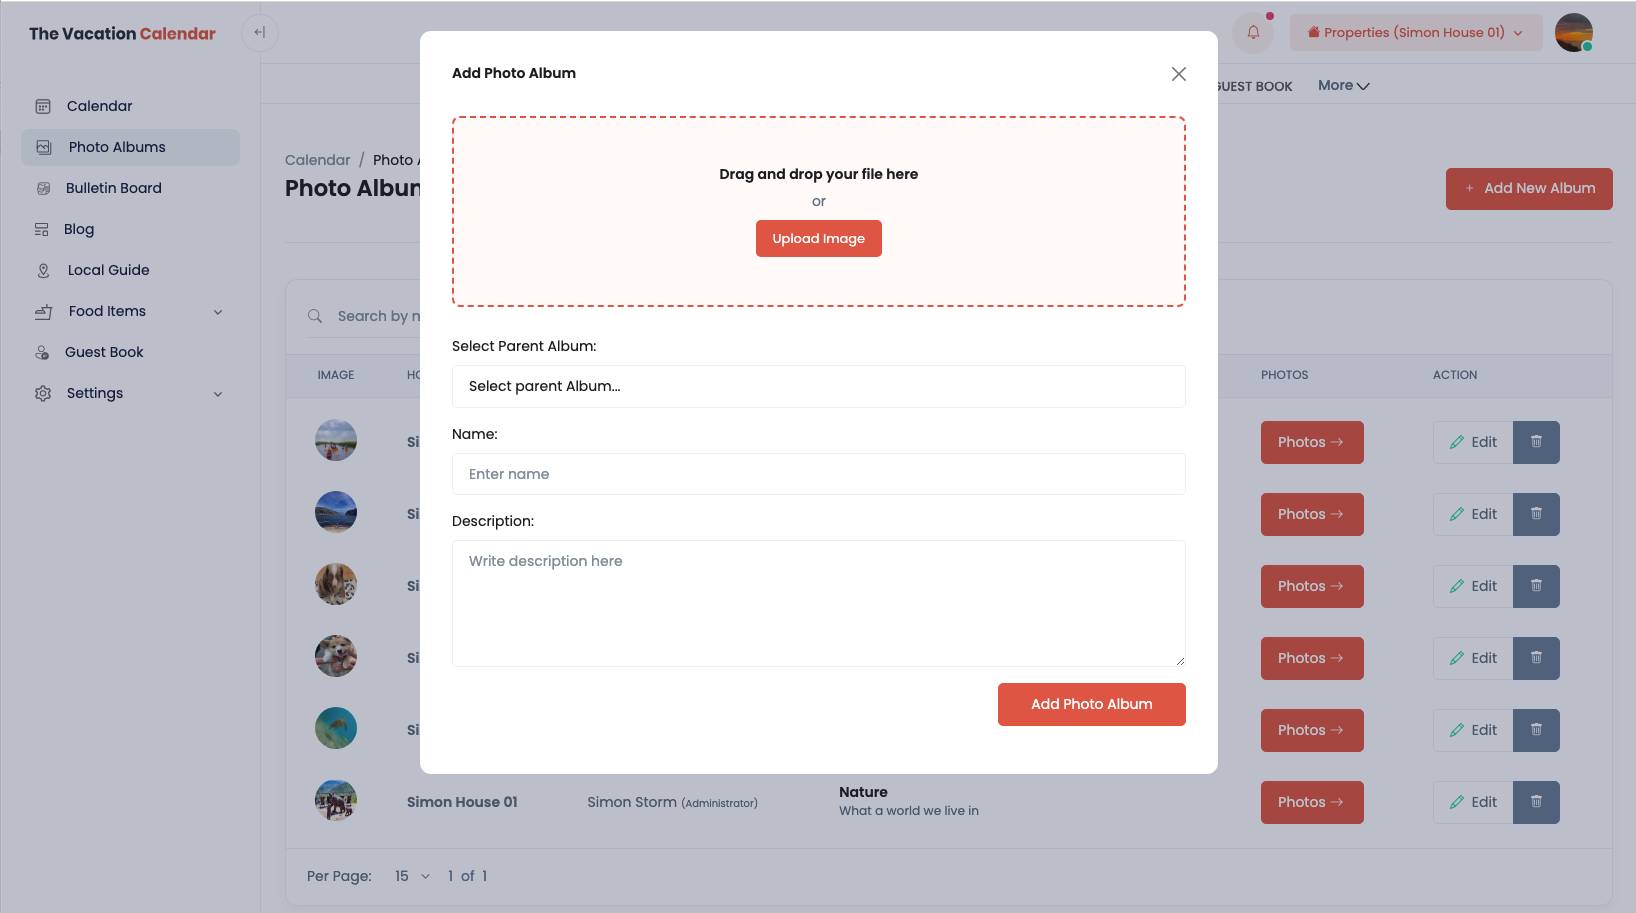
To create an album, simply click the Add New Album button. Here you can add an image (called a thumbnail) for the folder, you can select a parent album if you want this album nested, and you can label and give the album a description. A couple of important notes. If you don’t upload an image, the album will choose the first photo in the album as the thumbnail. Additionally, if you don’t select anything from the Select Parent Album, the album will be a top level album. This is not 100% intuitive and tripped me up the first time.
To go inside the album, click the Photos button for the album you want to see. Here you can add photos by clicking the Add New Photos and you can edit or delete existing photos by putting you mouse over the photo and clicking either the Edit button to edit or the trash can button to delete.
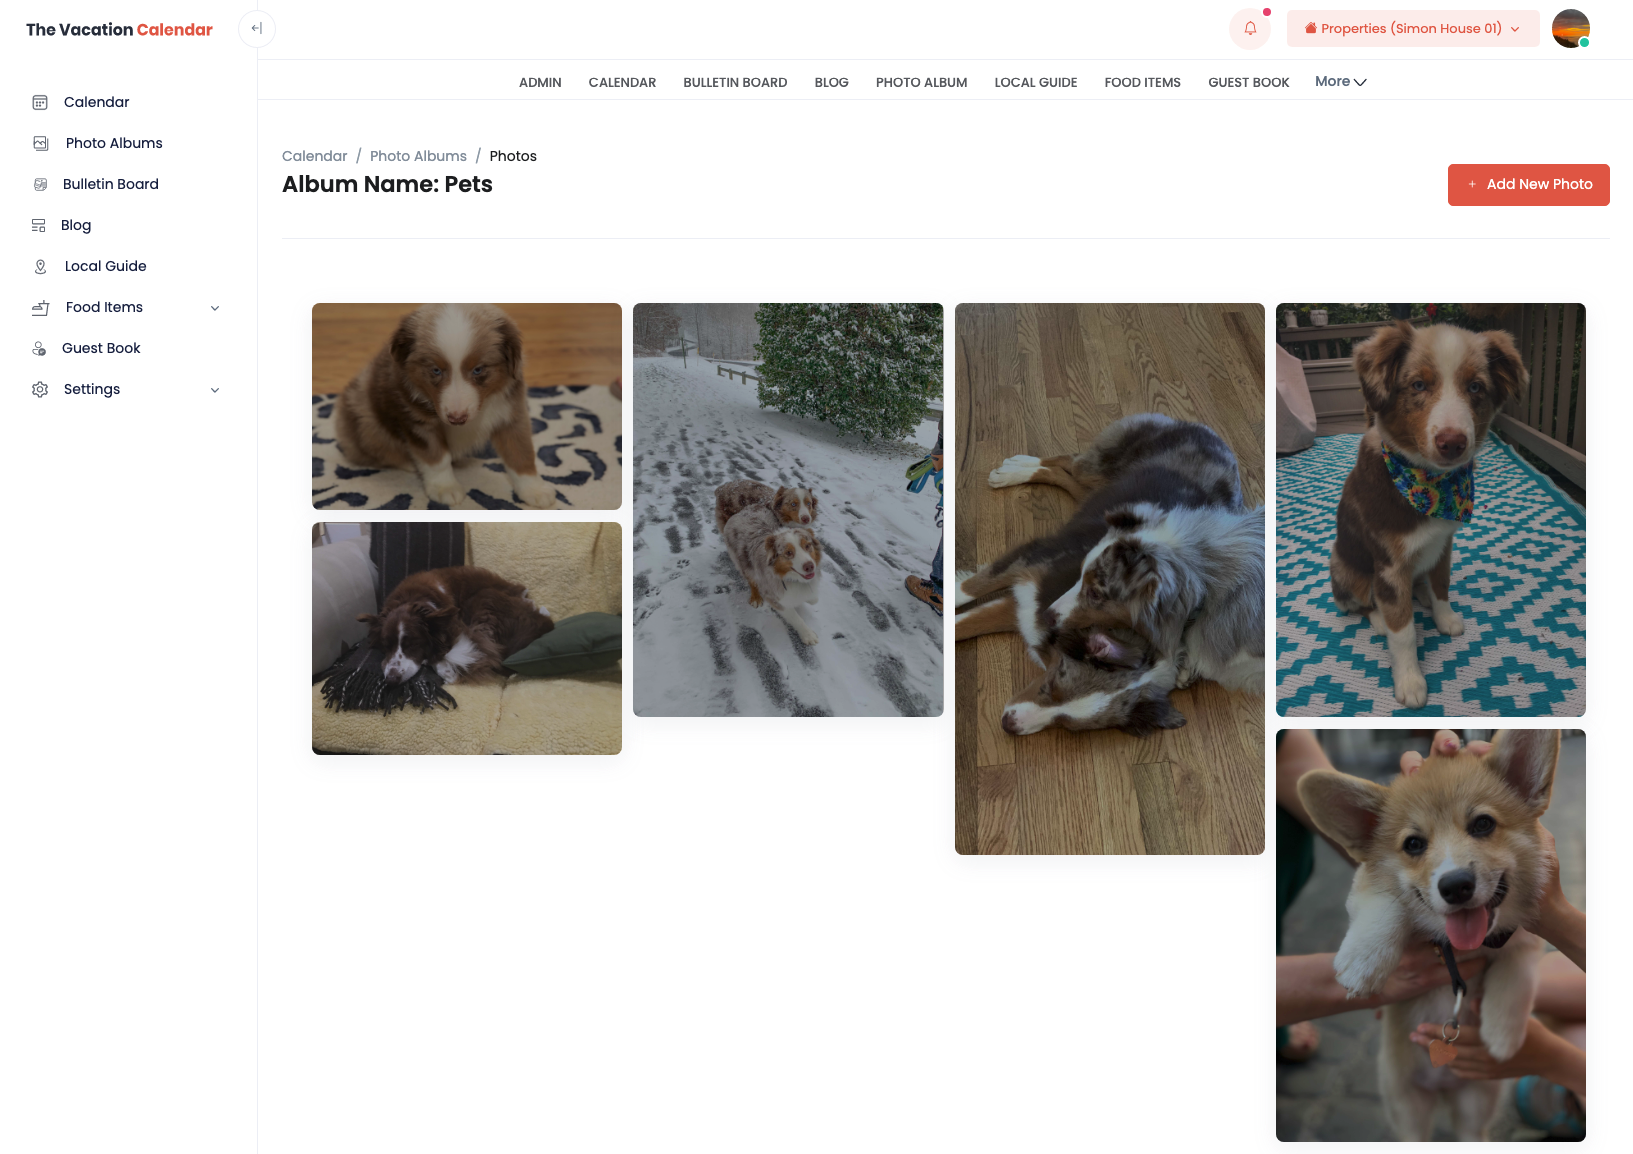
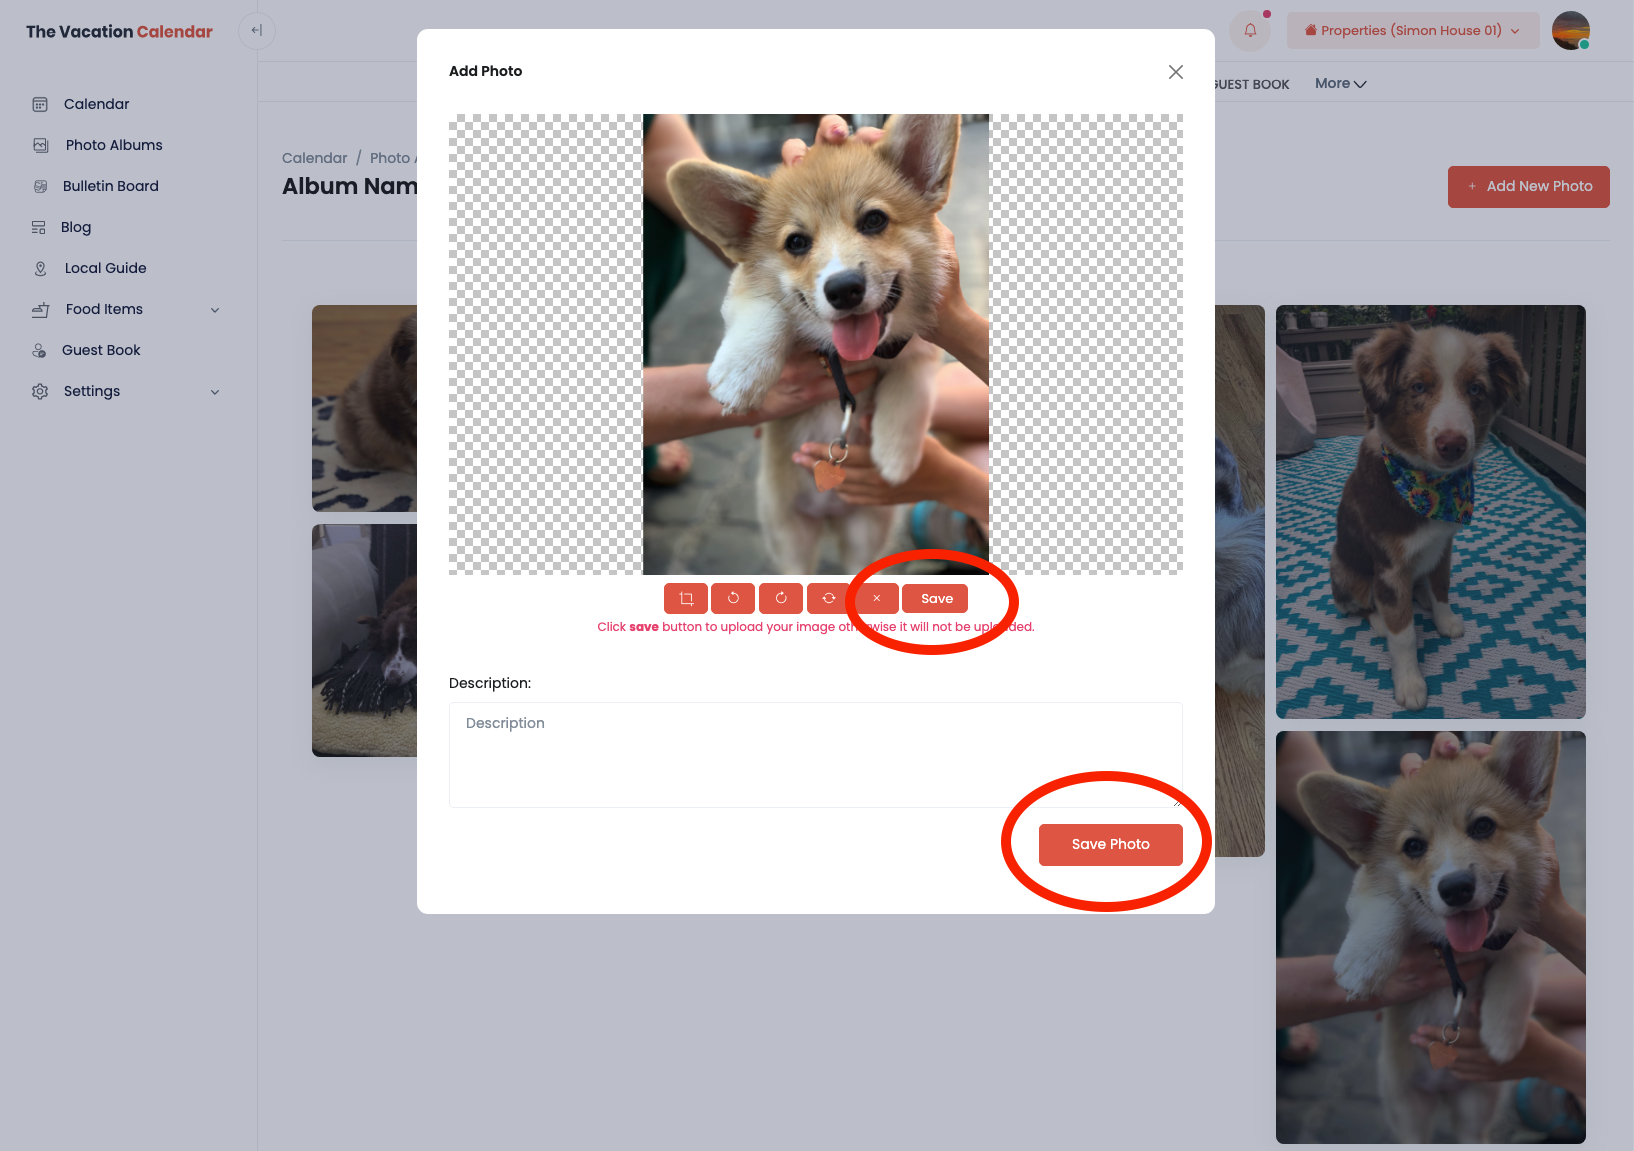
When adding a photo for the first time it is important to note that there are two saves. Once you either drag and drop or select the photo you want, you have the opportunity to rotate the photo, crop the photo, remove the photo, etc. When you are done editing, you will need to press the small Save button and upload the photo with these adjustments. Once you have uploaded your photo you have the option to add a description. When you are all set you press the Save Photo button at the bottom and the photo is added to your album.
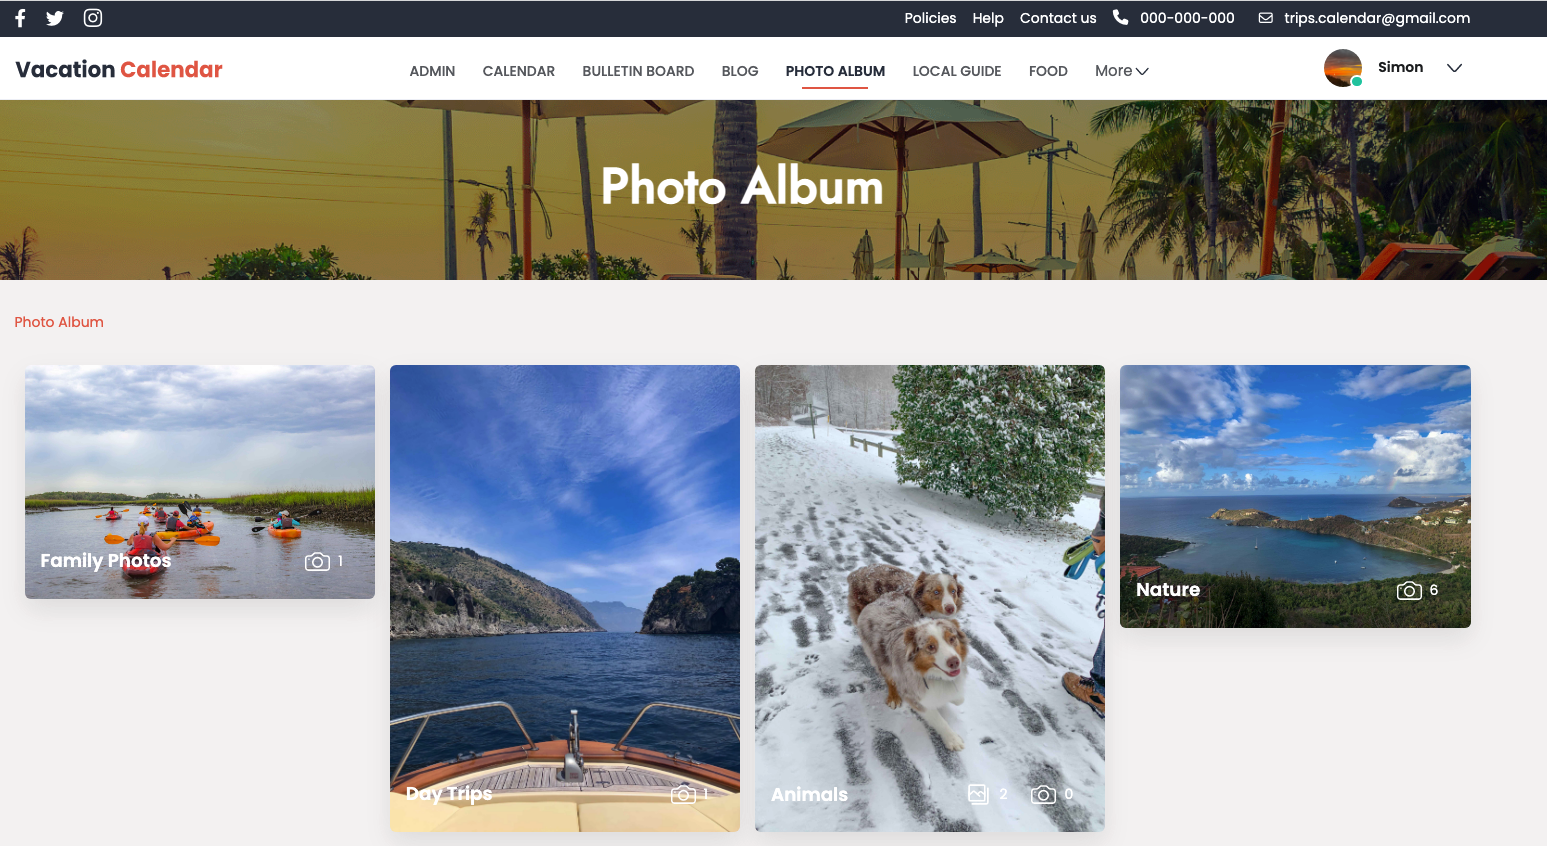
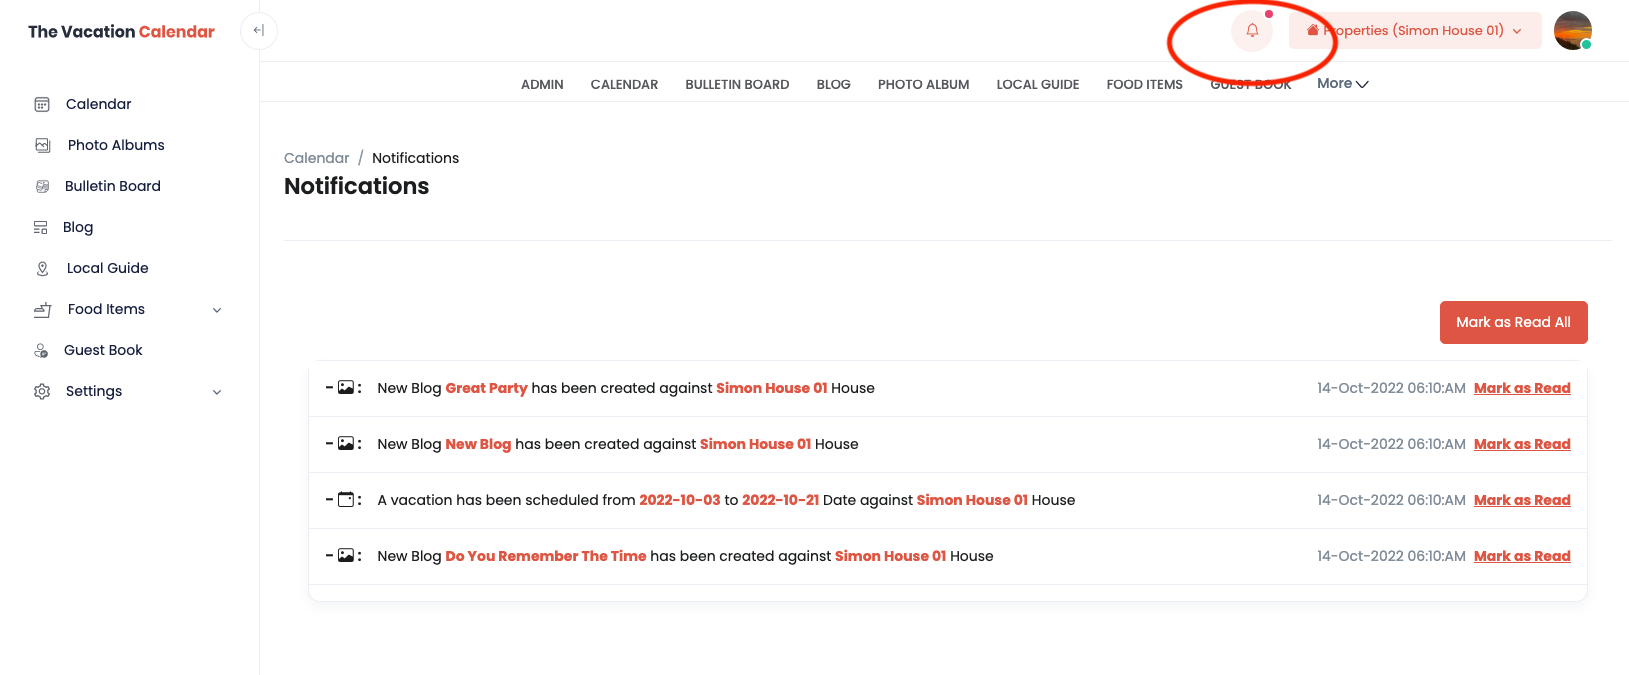
Your photo album is available in the Guest View by clicking Photo Album (circled in red) in the top navigation bar. Here you can see all the albums and you can click on the album to see the photos or other albums within the album. You can use the breadcrumbs (circled in green) to go up one more levels in the albums. All users have the ability to add photos to existing albums by clicking the Add New Photo (circled in blue). It is important to note that the Administrator is the only user that can create albums which is why it is helpful to set them up ahead of time for your users. This will also help to keep your photos well organized.

Over the years we have heard from users using the site for lake house calendar, beach house calendar, mountain house calendar, cabin calendar, condo calendar, ski house calendar, river house calendar and even an RV calendar. Given the wide use of TheVacationCalendar.com, we felt a modern photo album was exactly what the site needed to help capture memories from so many great vacation homes.
The blog is where your users can go to share stories about the time at your vacation home. Blogs can be organized into categories so that if you have very loquacious users, the blog won’t get overwhelming. The blog is ordered by descending date so the most recent blog will be at the top.
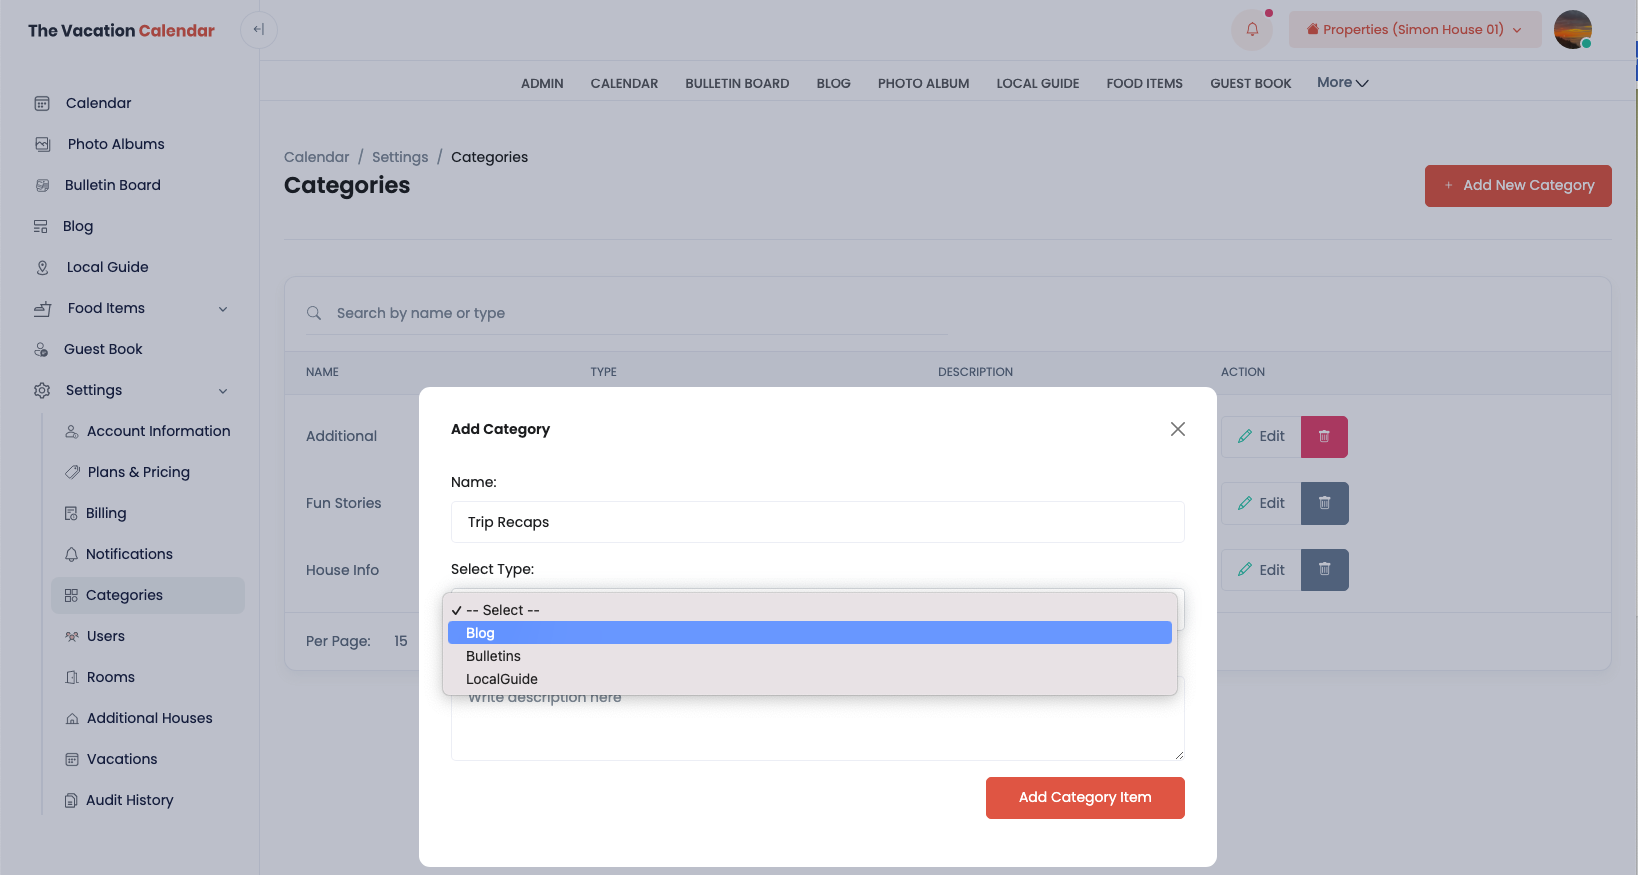
Again, as the Administrator, it is helpful to start in the Admin section of the site to set up the Categories for the blog. You can add a new Category from the Blog screens in the Admin section, going directly to the Categories in the Admin → Settings page or even access Categories when adding a new Blog entry. Please note that in the Categories page of the settings, you can add Categories for a variety of screens. Make sure to select Blog in the Select Type dropdown to add a new Blog category.
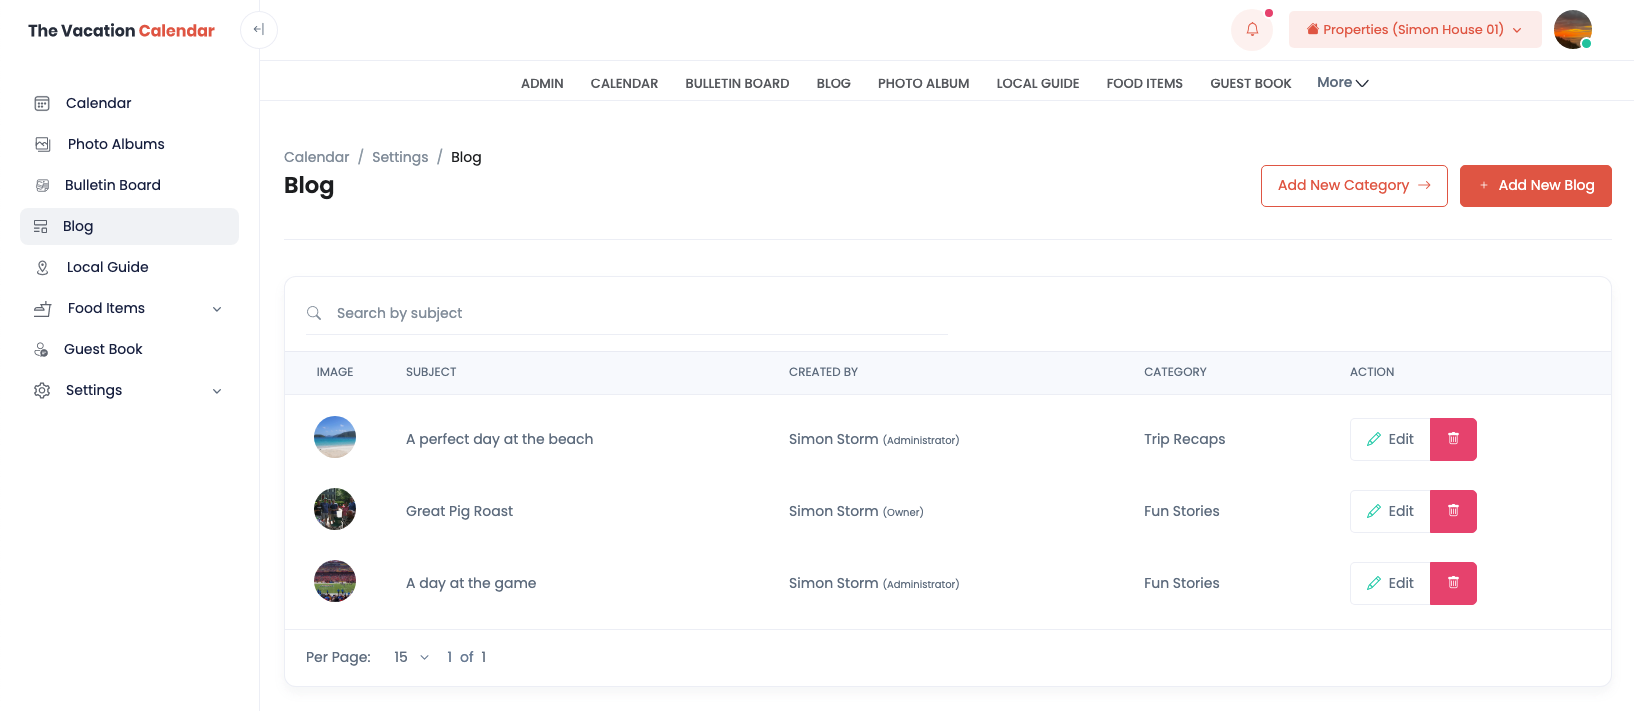
From the Admin section, the Administrator can edit and delete blog entries.
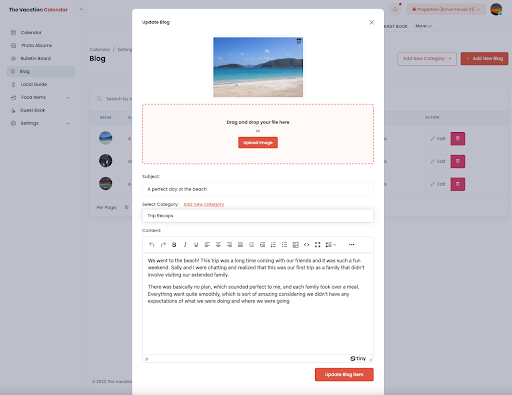
When adding or updating a Blog, you have the ability to add a photo which will be displayed prominently as well as a title (subject) and content. In the add and update screen you can select the category of the Blog.
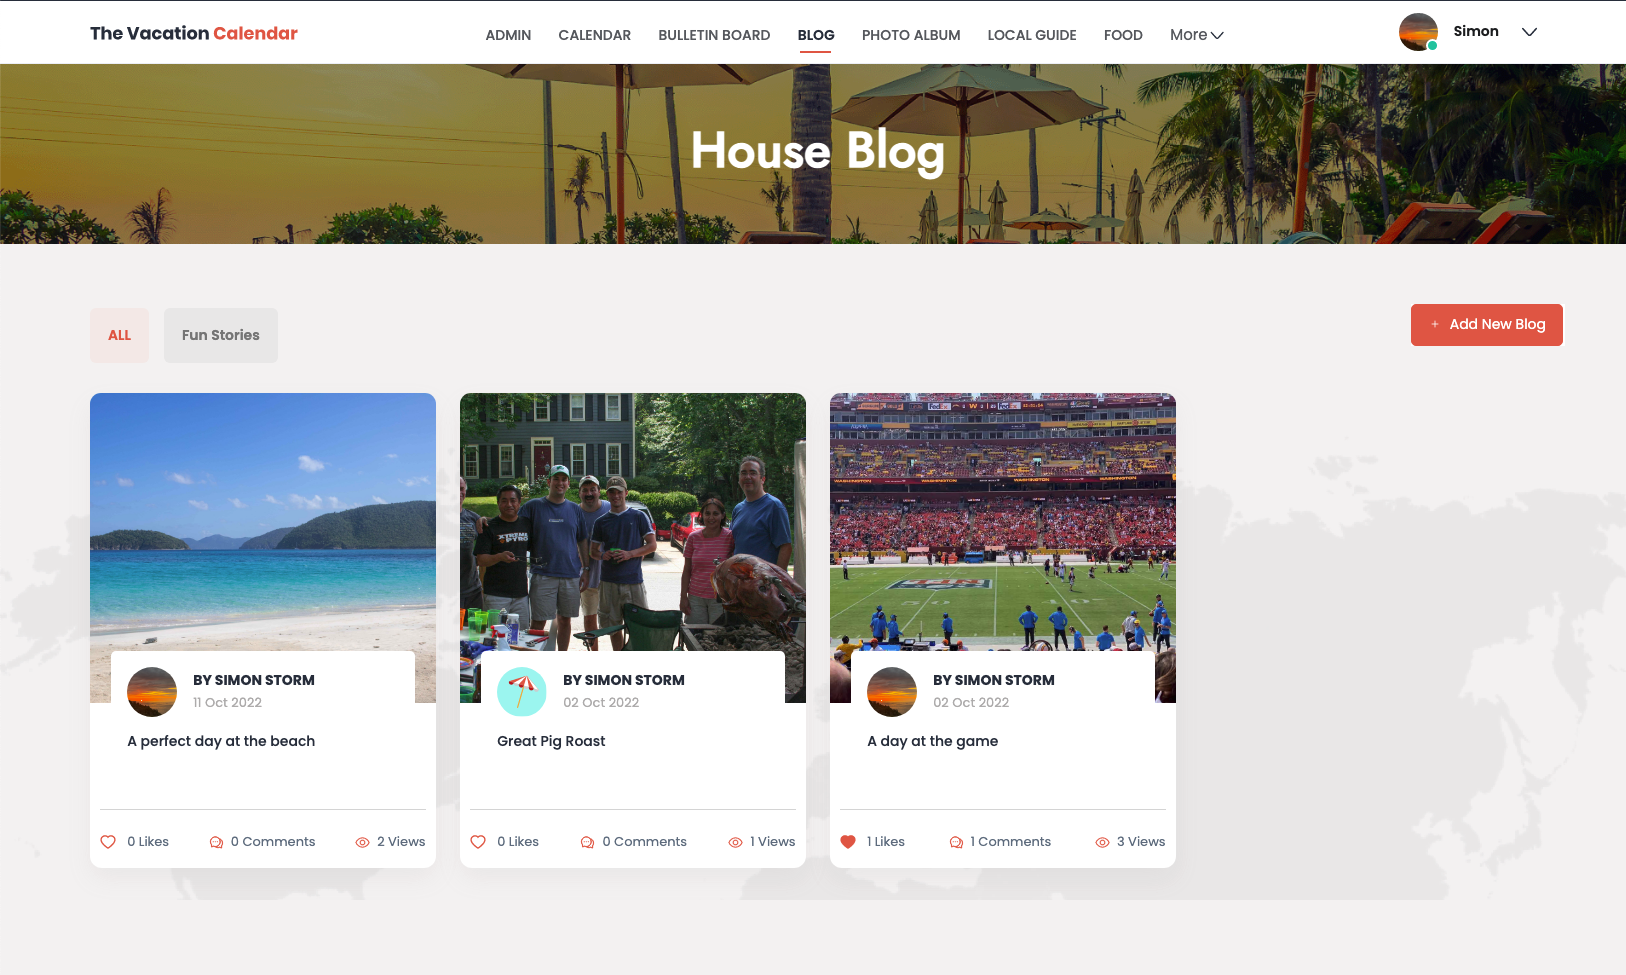
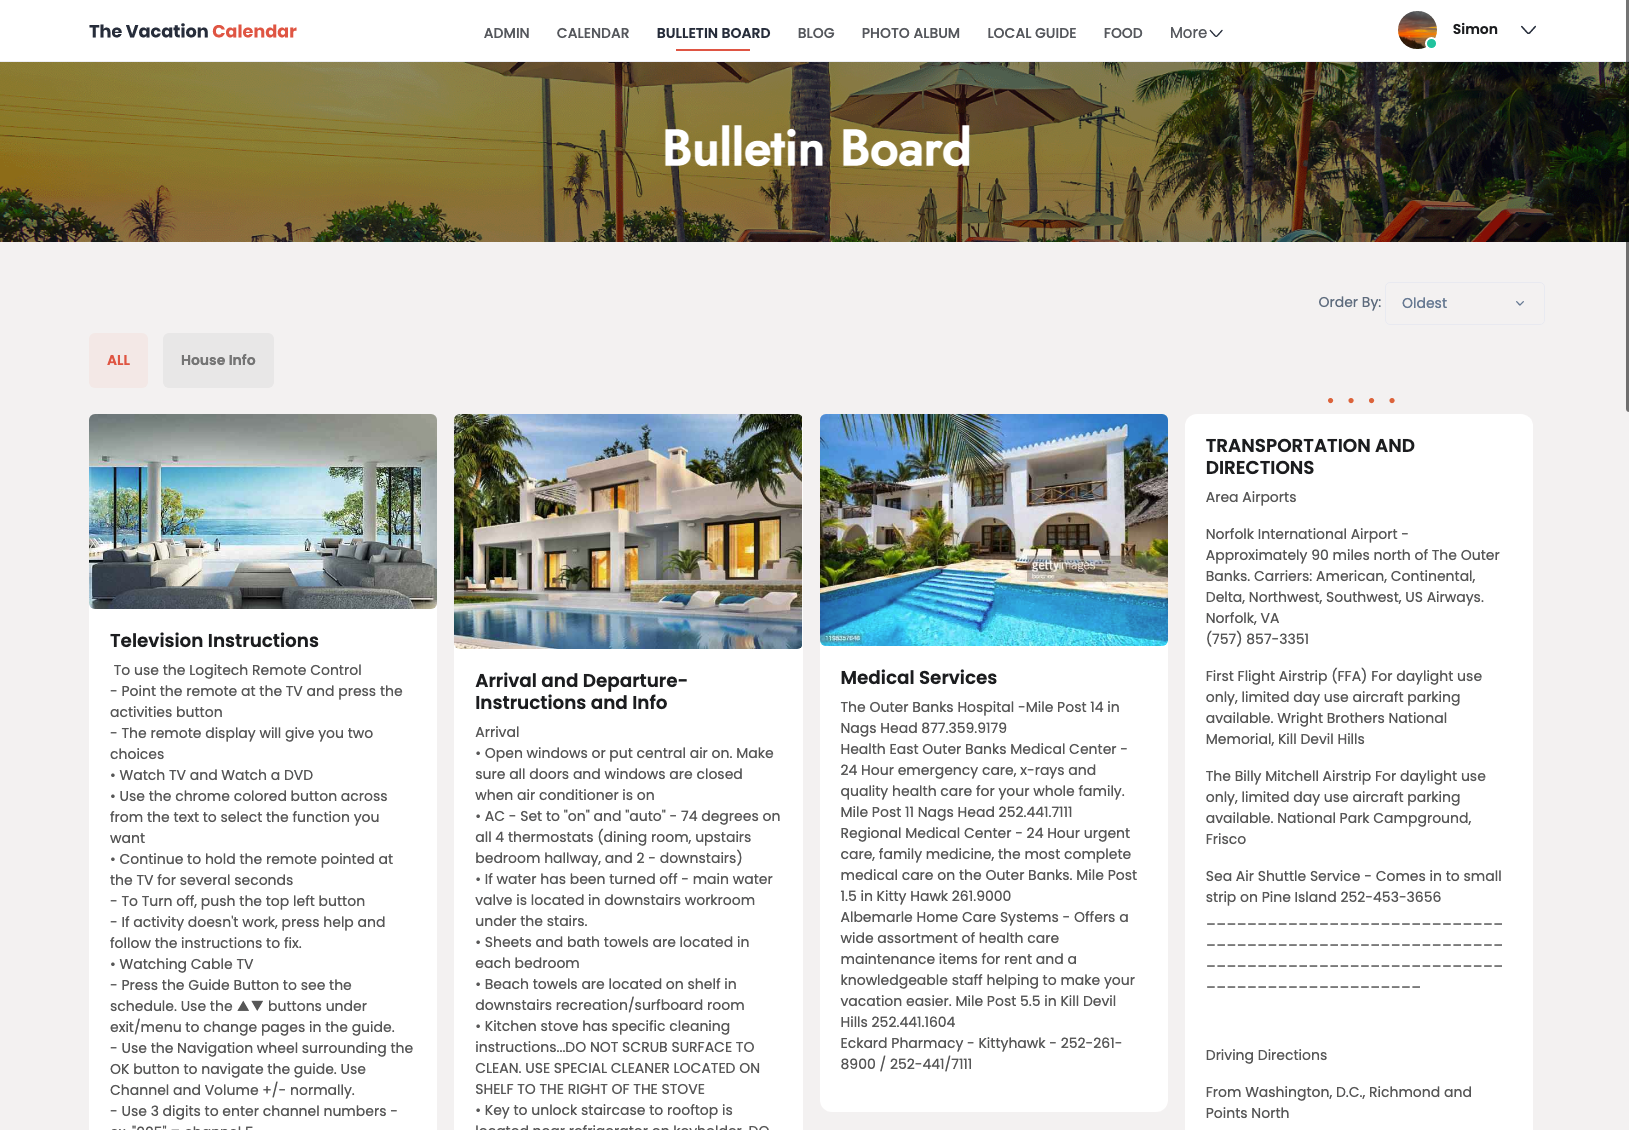
In the Guest View of the blog pages. Users can filter blog entries by category and then click on a blog to see all the content. Users have the option to like the blog entry as well as add comments.

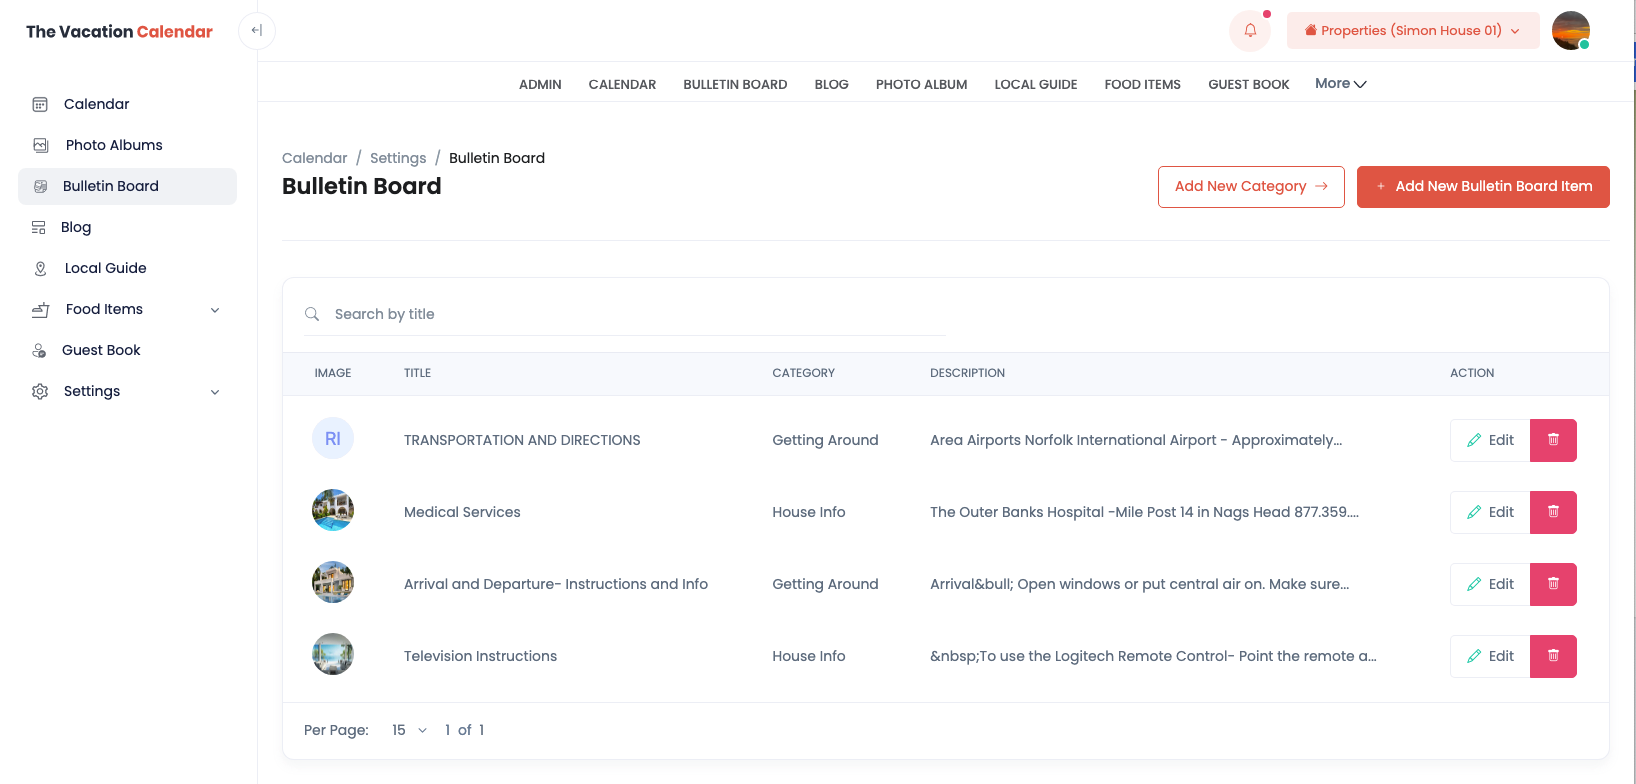
The House Bulletin Board is one part of the site that is completely controlled by the Administrator. It is important to note that the bulletin board is set up in what is known as a “card layout”. The reason for this is that a single big page of text does not work for mobile phones. As a result, to create an effective bulletin board for your house, you will need to break the content you want to convey into individual entries.
The House Bulletin Board is set up in the Admin section of the site. Similar to other features, the Administrator can set up categories to organize the bulletin board posts.
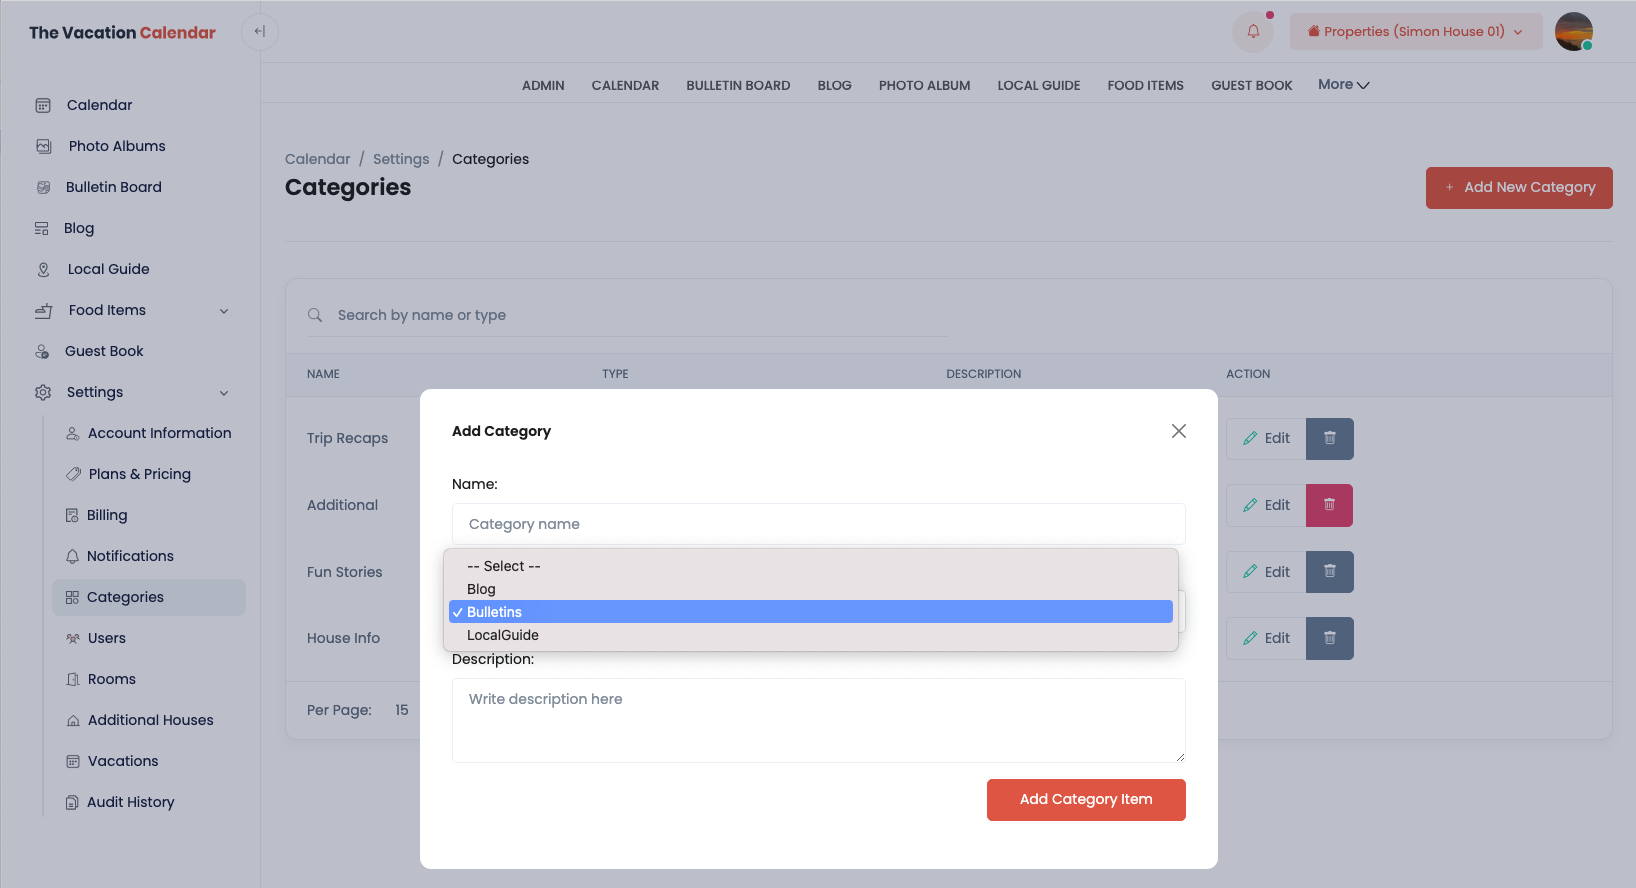
Please note that in the Categories page of the settings, you can add Categories for a variety of screens. Make sure to select Bulletins in the Select Type dropdown to add a new Bulletin Board category.
When adding or updating a Blog, you have the ability to add a photo which will be displayed at the top of the entry and you will be able to add a title and the bulletin board content. In the add and update screen you can select the category. Please note that by clicking the ellipse (3 dots) you will find additional formatting options for your information.

The local guide works similarly to blog posts, but they are designed to be more permanent so you can create your own guide book of things to do, places to eat, and other helpful recommendations.
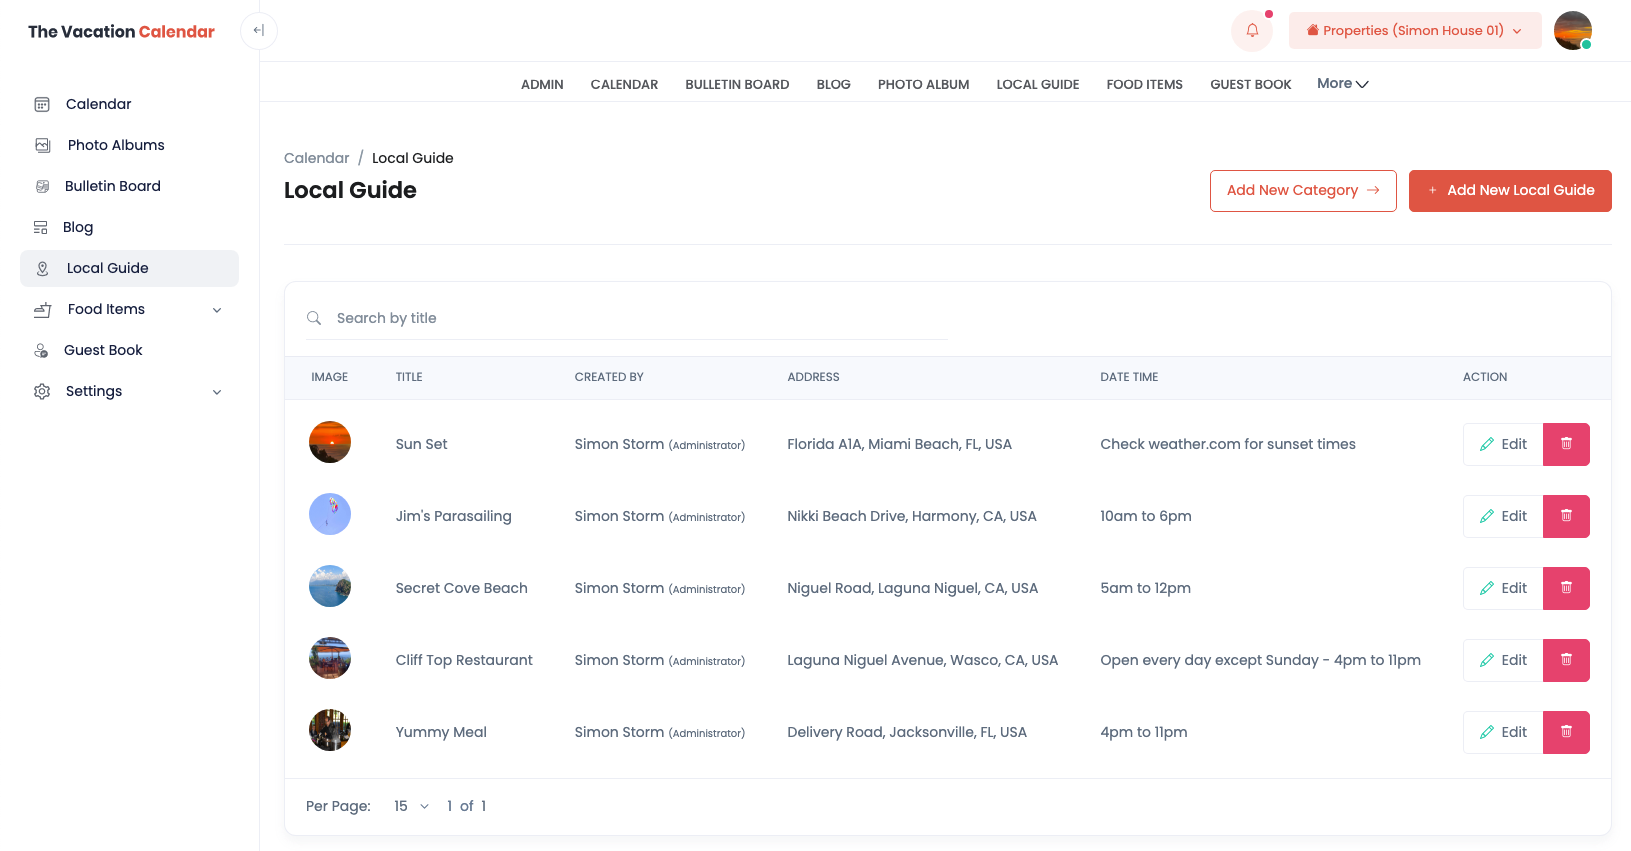
The Administrator should start in the Admin section of the site to set up the Categories for the Local Guide. You can add a new Category from the Local Guide screens in the Admin section, going directly to the Categories in the Admin → Settings page or even access Categories when adding a new Local Guide entry.
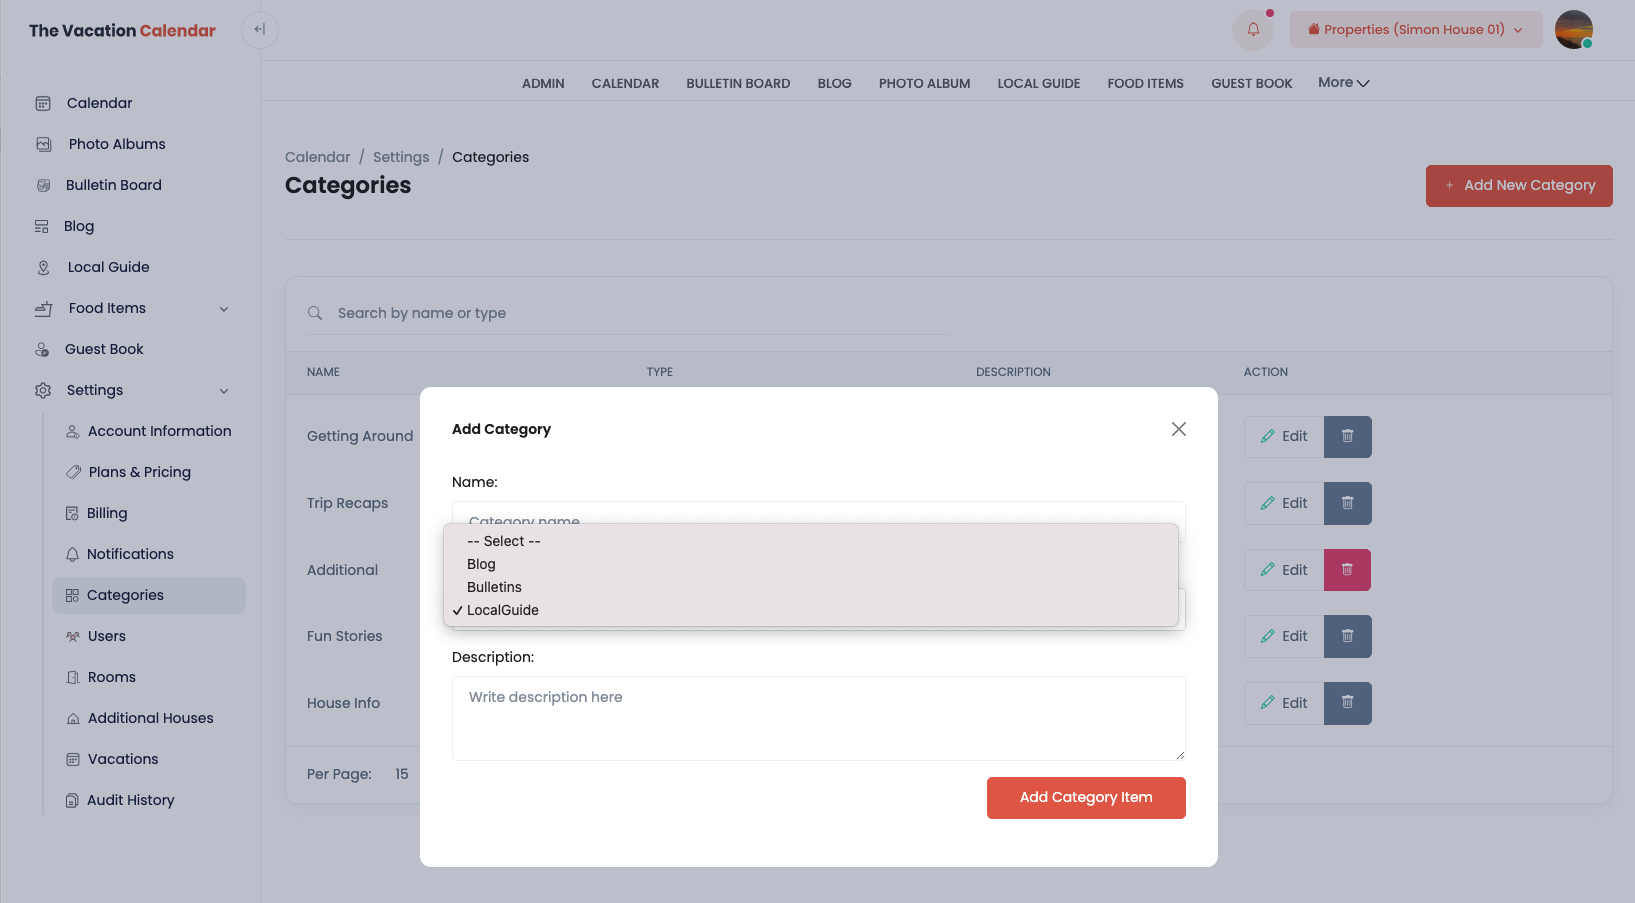
Please note that in the Categories page of the settings, you can add Categories for a variety of screens. Make sure to select LocalGuide in the Select Type dropdown to add a new Local Guide category.
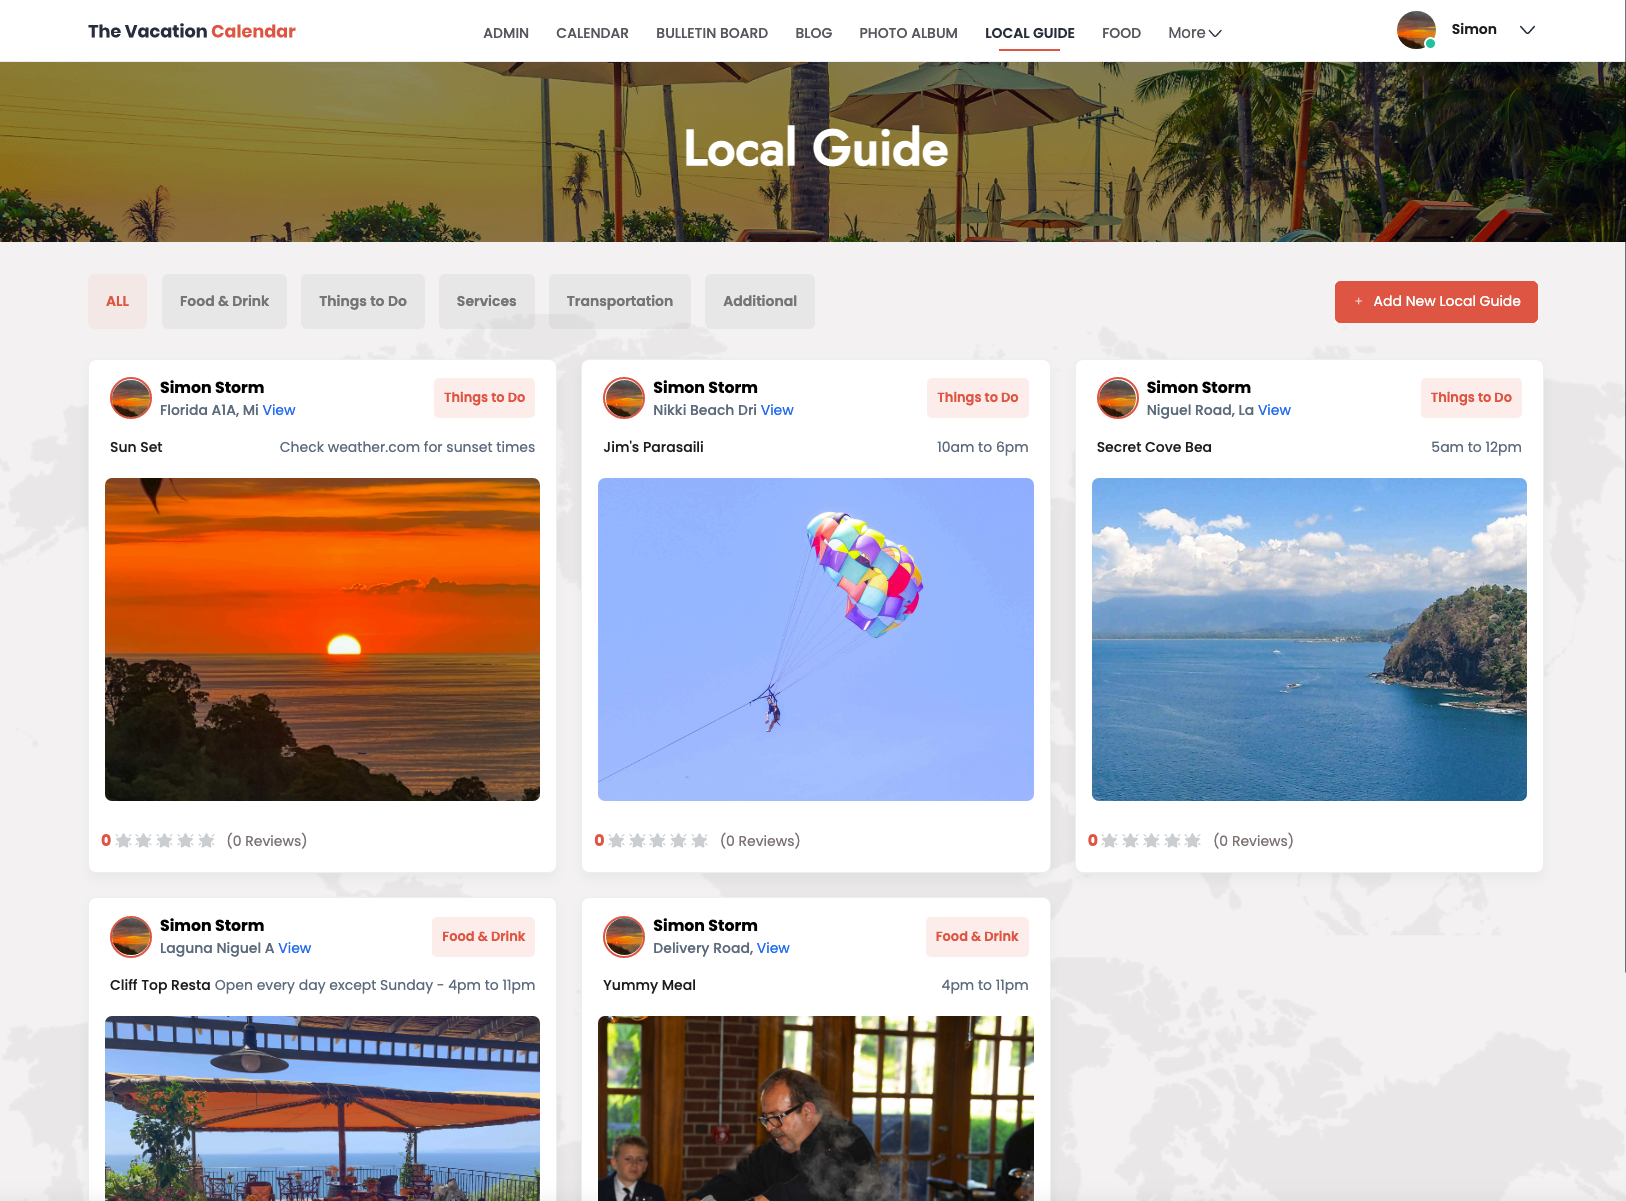
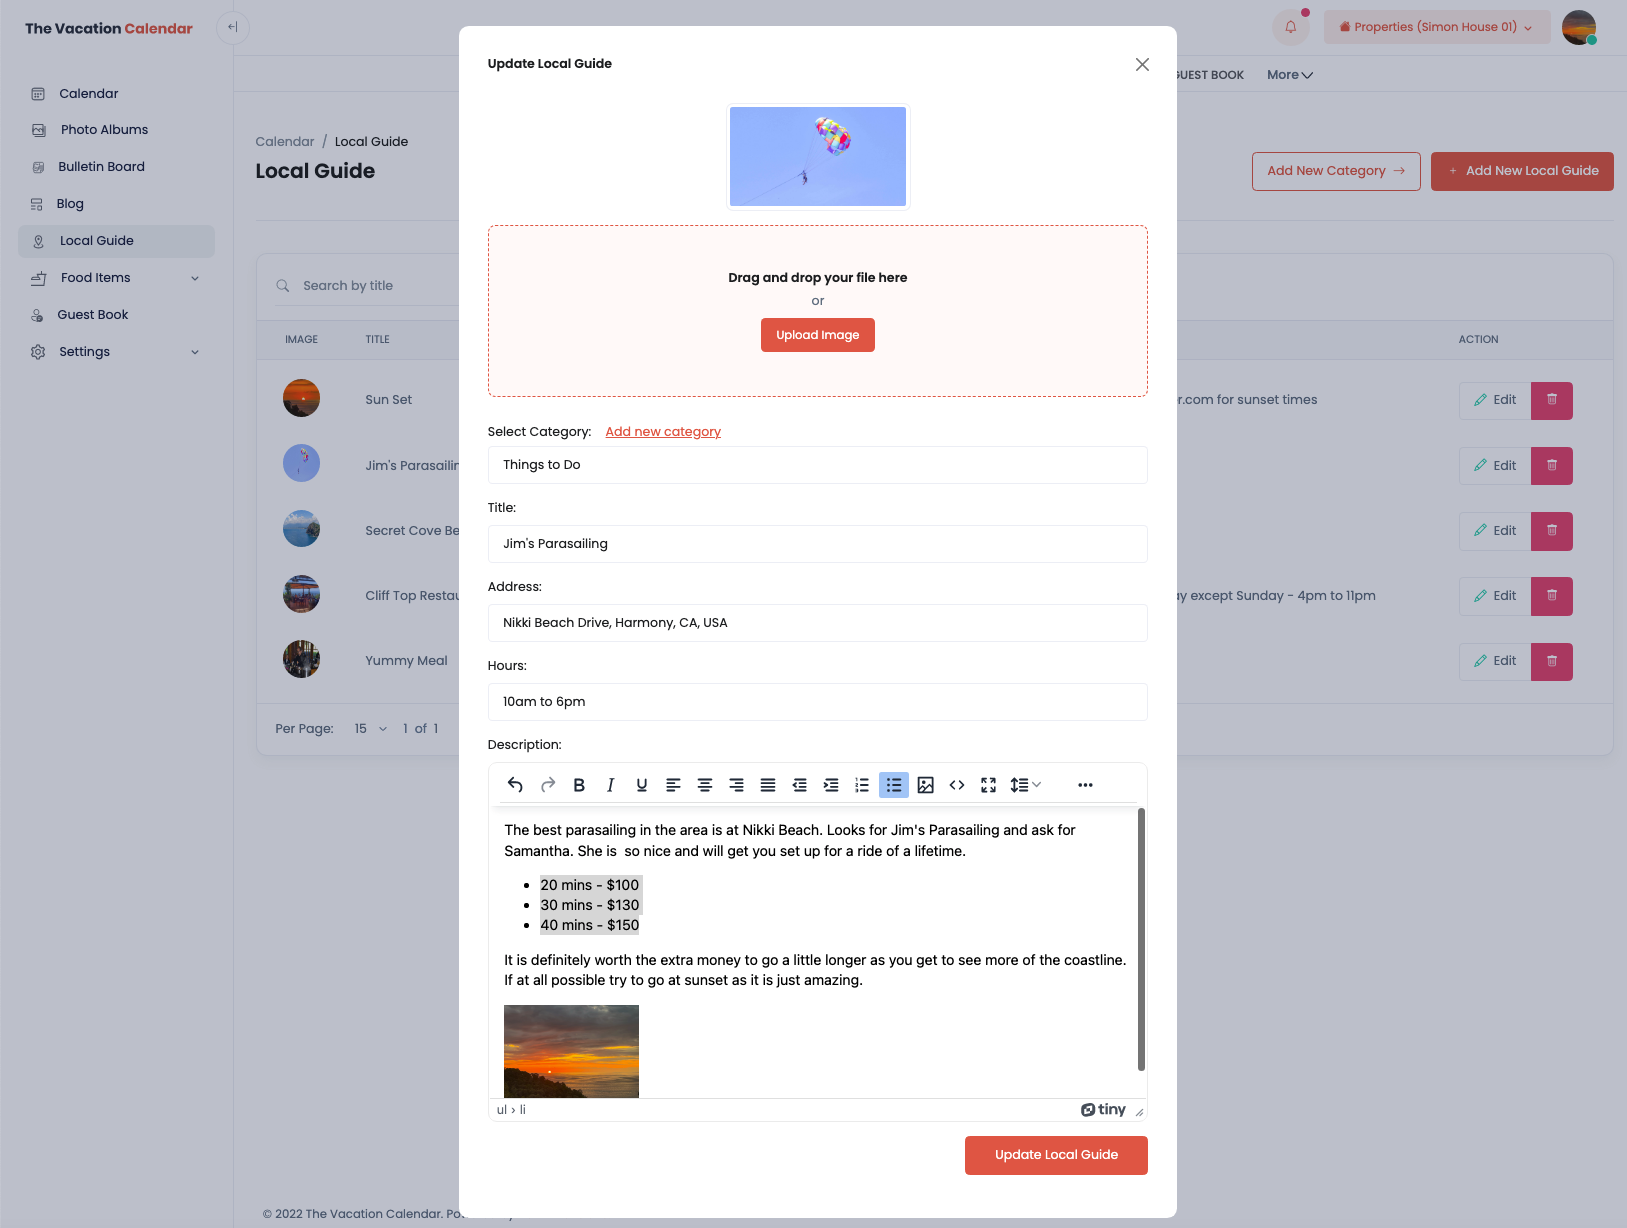
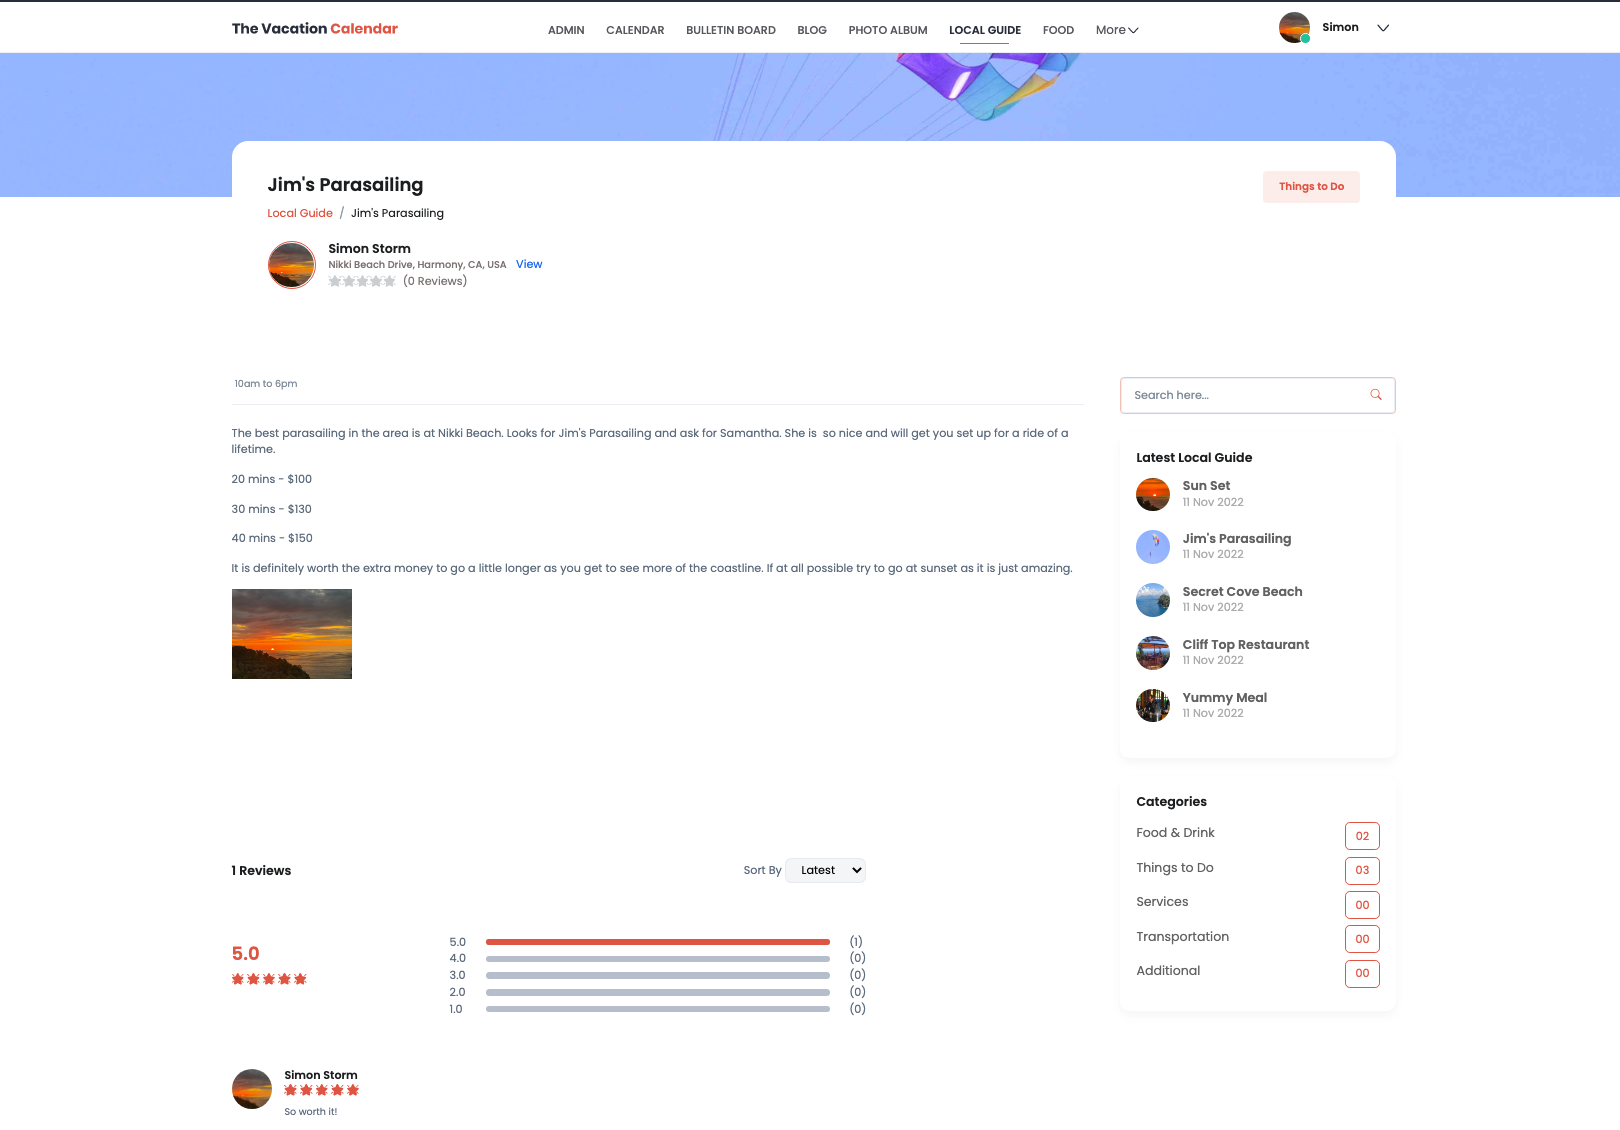
When adding or updating a Local Guide entry, you have the ability to add a photo which will be displayed prominently. The Local Guide leverages Google Maps for the address so that you can type in an address and Google Maps will help you find the exact location. This allows users to click on the View to see the location on a map and easily get driving directions. After entering the category, title, address, hours when the item is open or available, the user has the ability to put in a detailed overview of the entry which can be formatted, include images, etc.
Users can access the local guides from the top navigation and by clicking on the image of the entry, can see the additional details that were provided. All your users can add ratings and comments to the local guide entries so that other guests can see what really is popular and highly rated.
Users can leave a review or thank you in the Guest Book section of the site. This should be very straightforward for users to do.
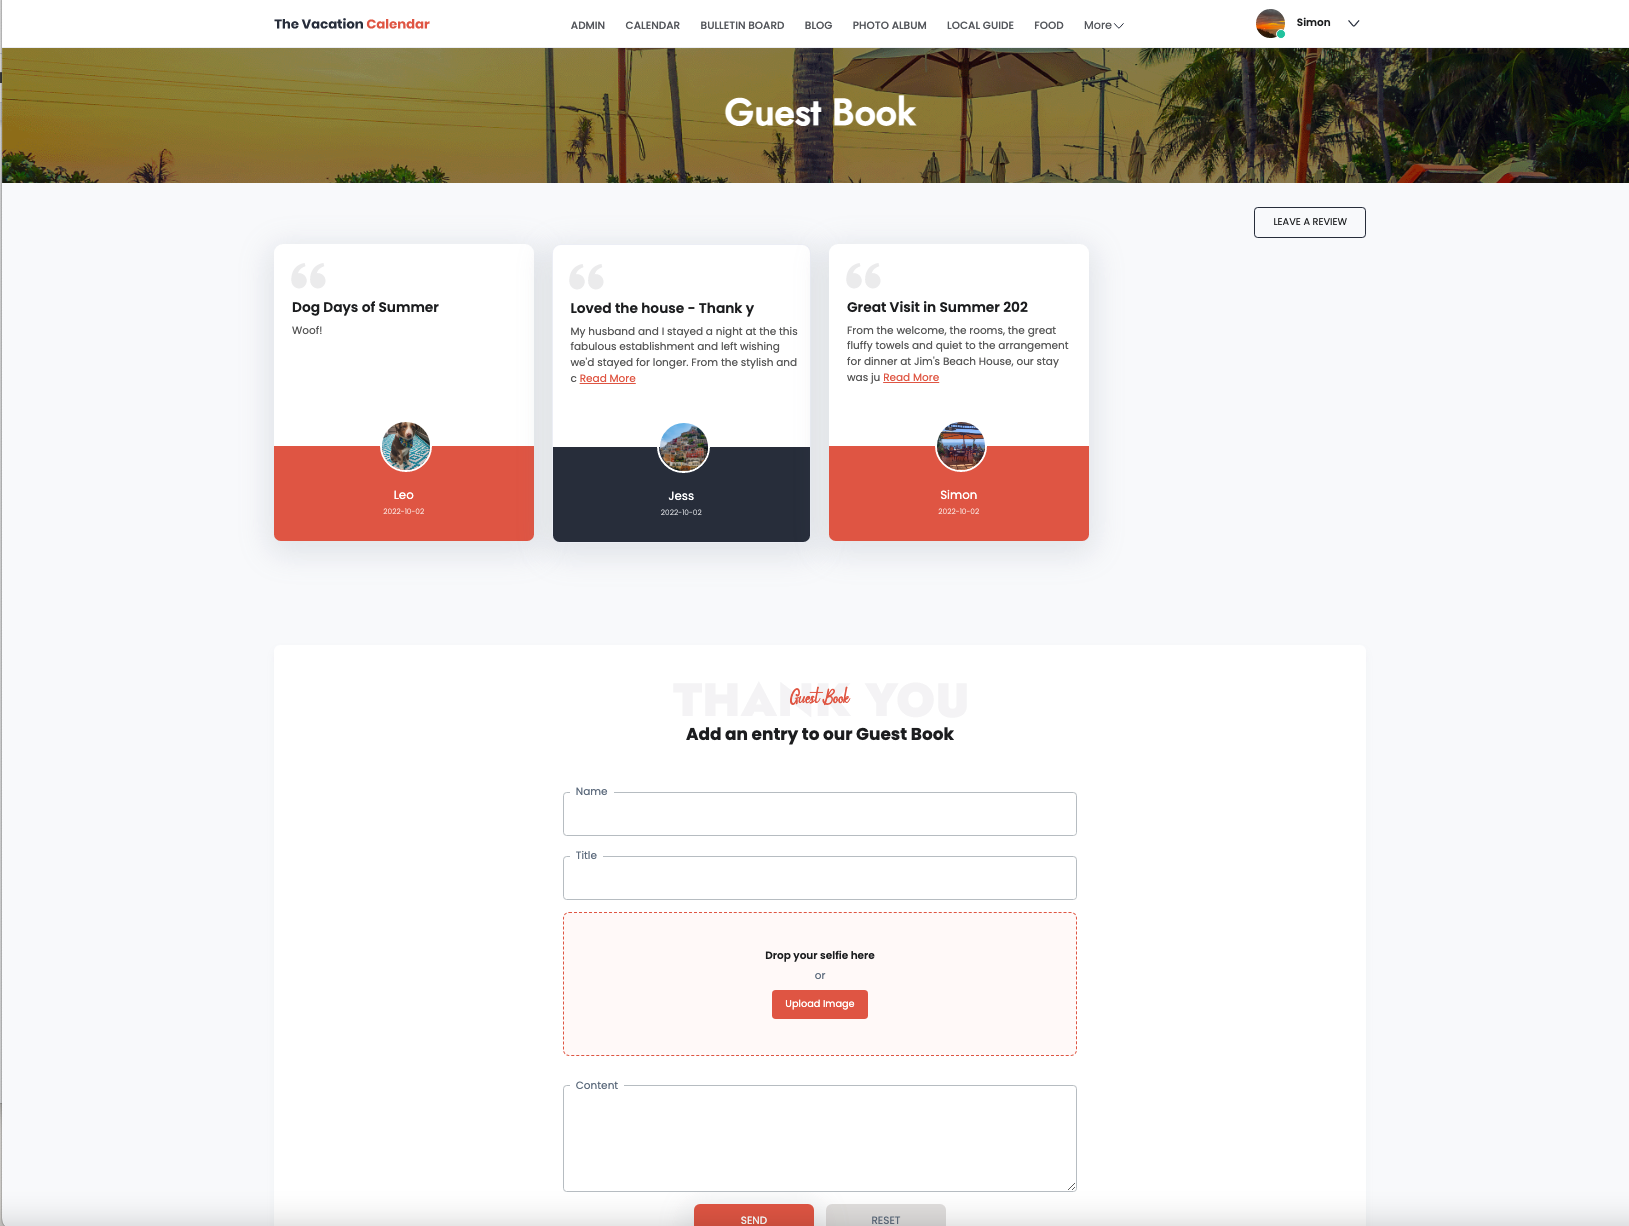
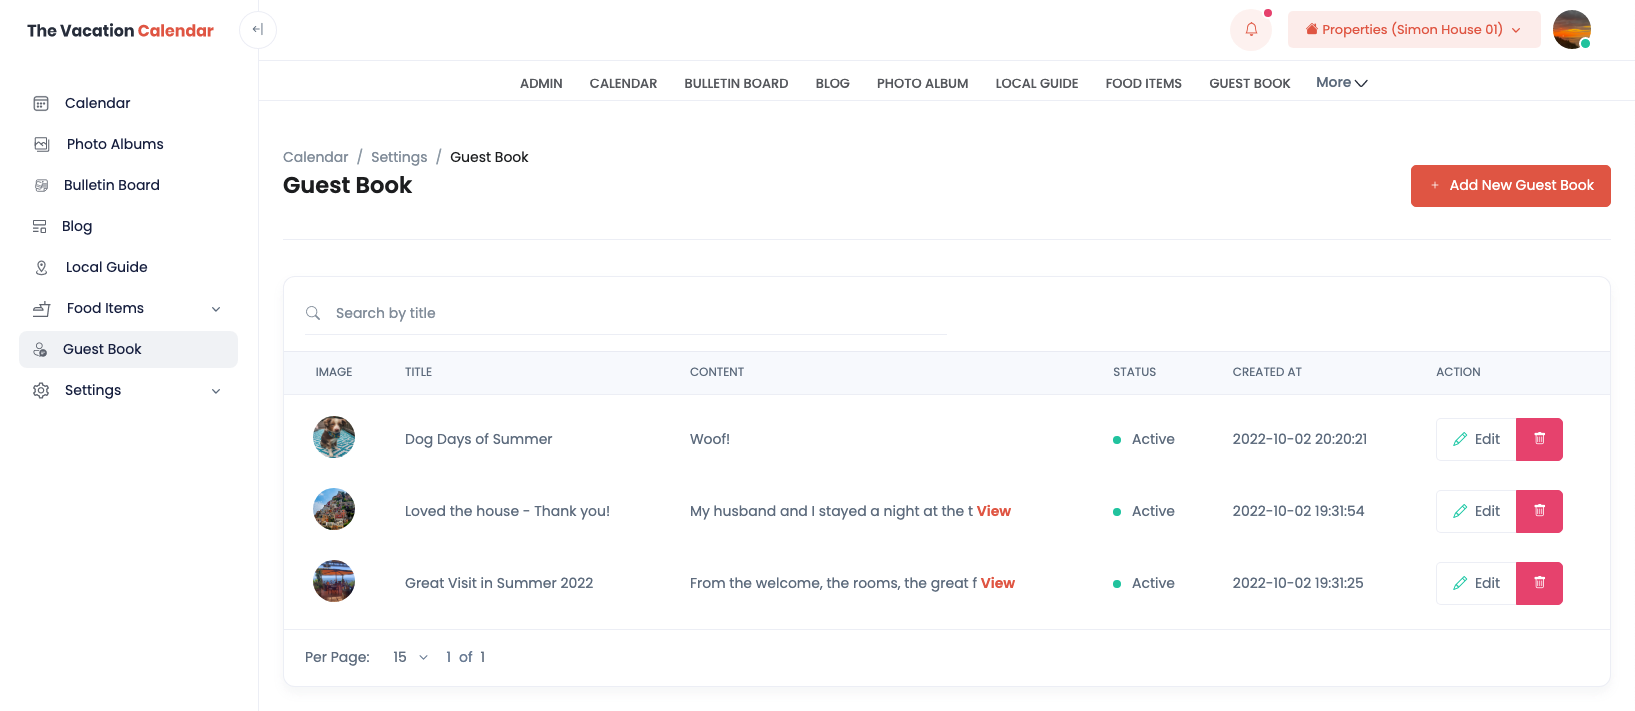
The only item of note is that the posts are not put on the site until the Administrator approves them. The Administrator can see all the posts in the Admin section of the site.
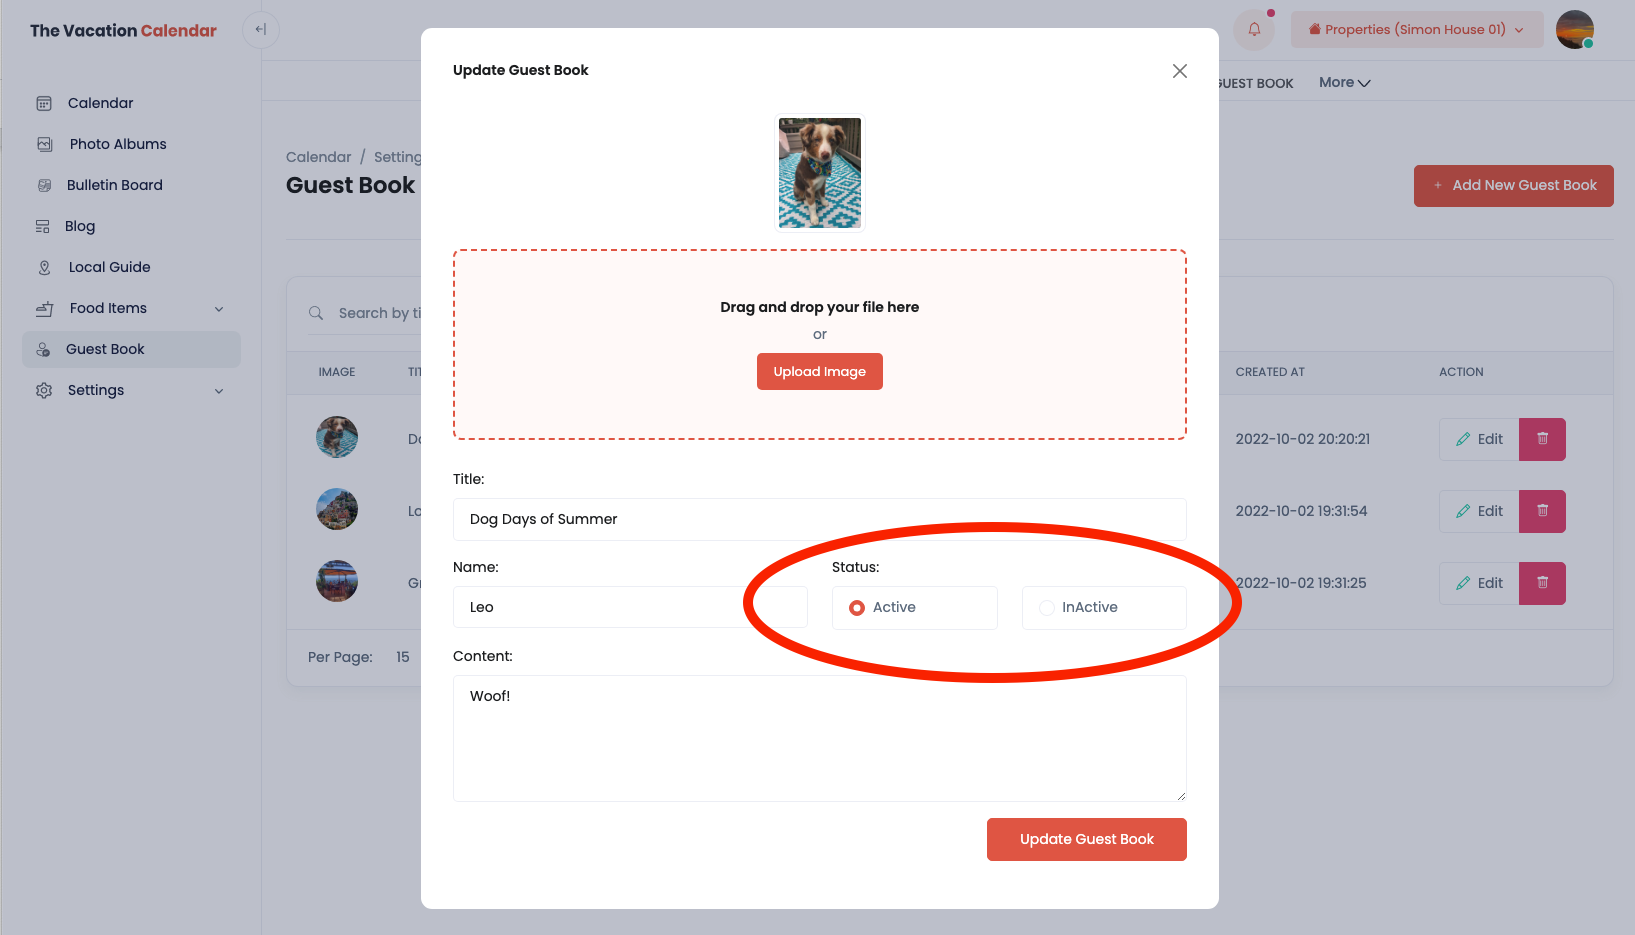
Since the Guest password is a shared password, it is not possible to know who is actually posting comments. Just in case someone has less than the best intentions, the Administrator has the opportunity to review a post and then make it active if it is approved.
Whether you are using the site for lake house calendar, beach house calendar, condo calendar, ski house calendar, mountain house calendar, river house calendar, cabin calendar and even an RV calendar. We hope this feature will help you memorialize all the wonderful guests that have enjoyed your vacation home!
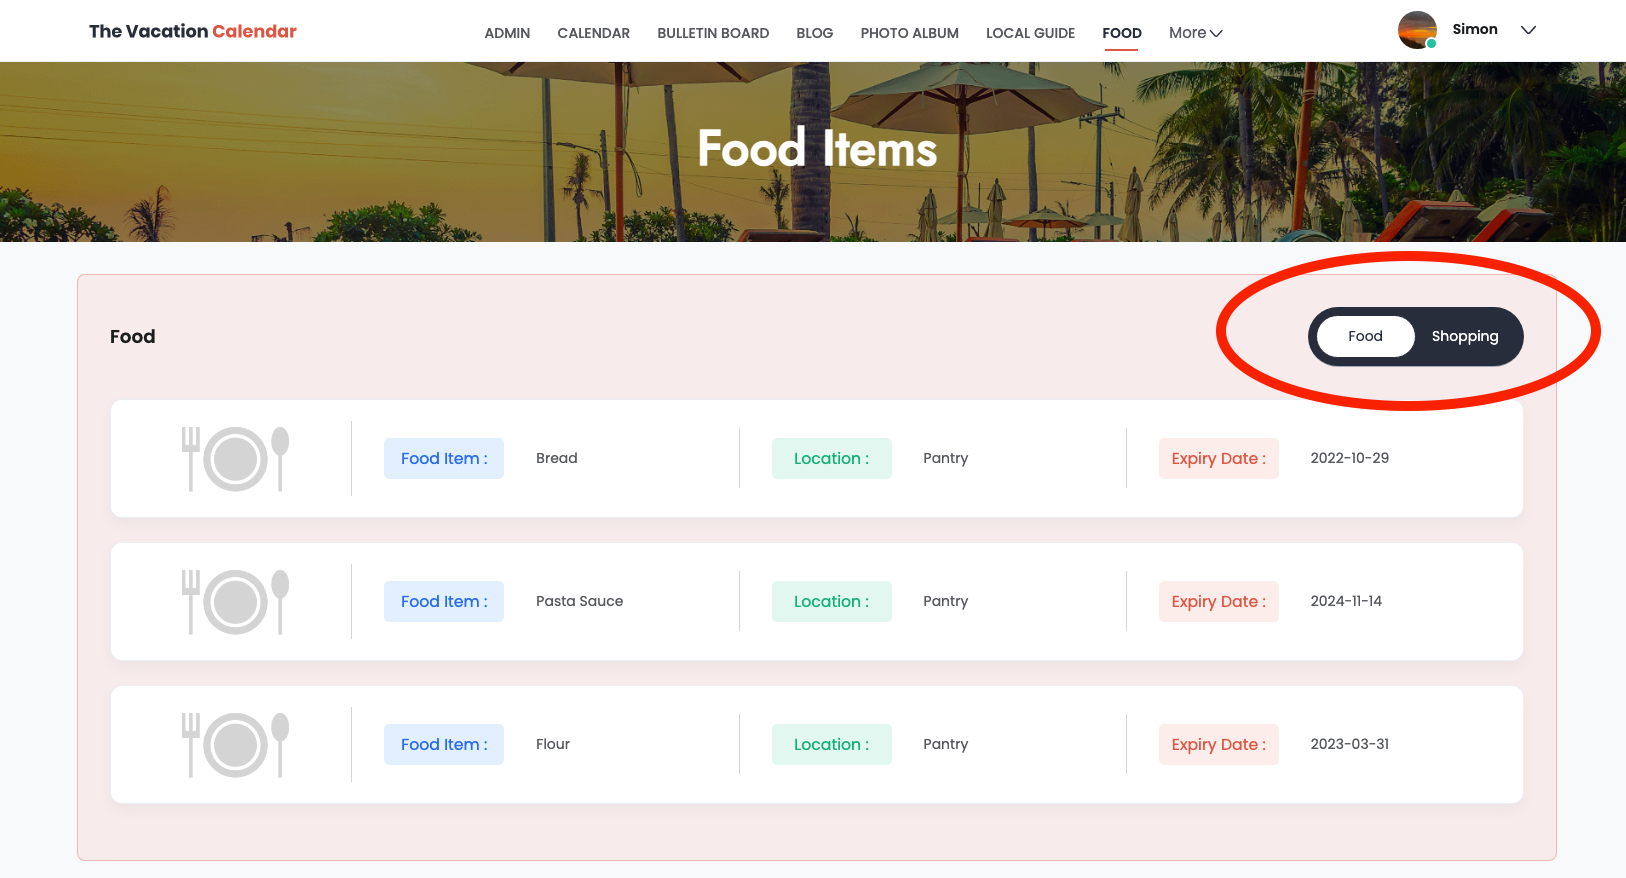
Another very straightforward feature are the two Food Items pages. These pages are designed to help families keep track of the food that is in the house and what needs to be picked up at the store. This is an important feature for my family as we get the privilege to stay at an amazing home in the Caribbean from time to time. Unfortunately, groceries are crazy expensive and many items are hard to find so it is nice to bring a few things down when we come. Now everyone knows what is at the house and what pantry items need to be picked up. The lists can be found under Food Items on the top navigation bar. Users can switch between the two lists by using the toggle on the top right.
In the Admin section of the site, users can add and delete food items for the two lists.
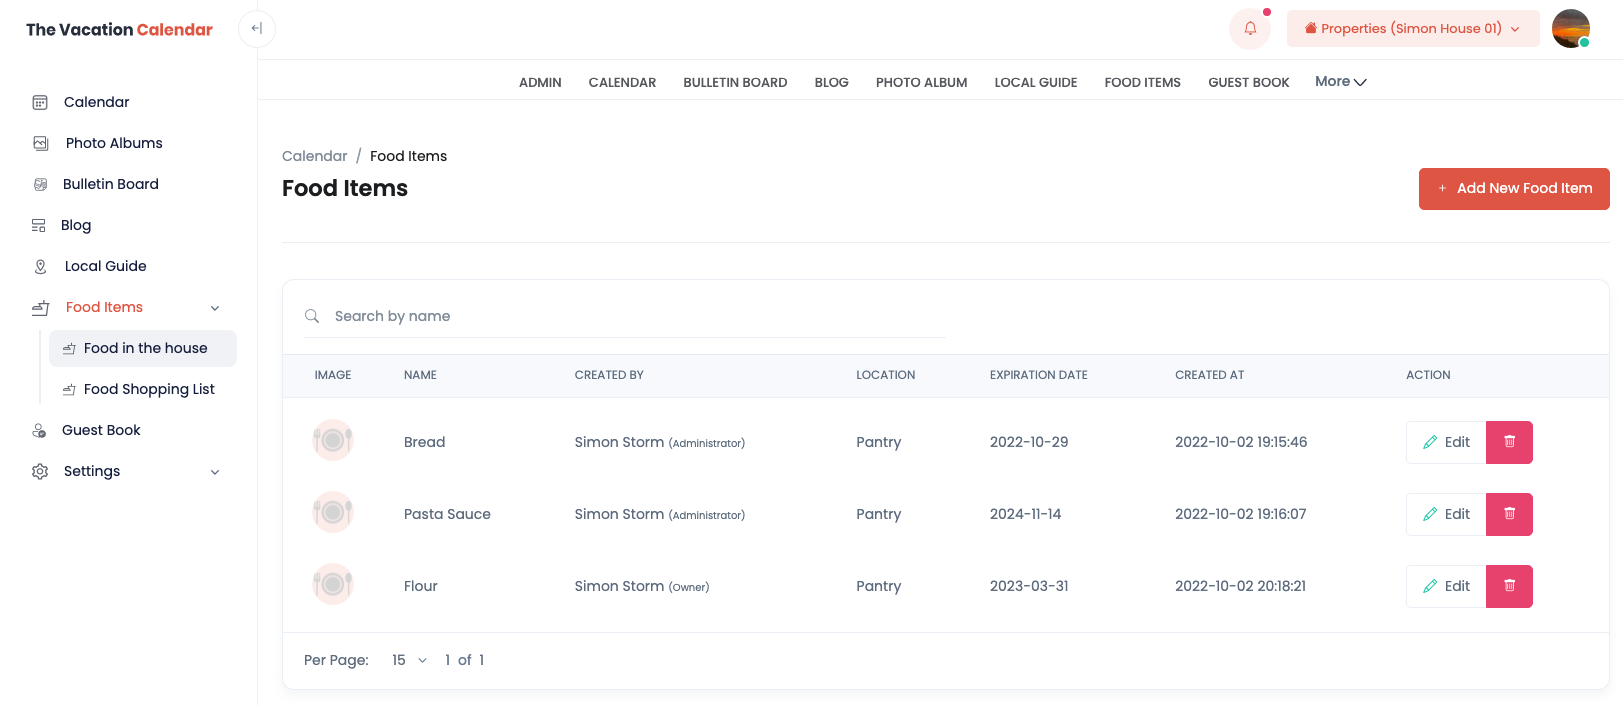
When adding new items, users have the option to add a photo in case there is a particular brand or type of food needed. The food items in the house have a field for the expiration date and the location in the house while the shopping list items have a field for where to buy the item.

Comming Soon.!
Don’t want to have multiple logins for your lake house calendar, ski house calendar and beach house calendar? Setting up additional homes is extremely easy. As long as you have upgraded to our Premium plan, you are able to add up to 9 additional houses. This is helpful if you have several cottages or cabins, or just happen to be lucky enough to have a bunch of vacation homes. To add another house, simply go to the Admin section, expand the settings, and click the Add New House button. Fill out the additional information and you are good to go.
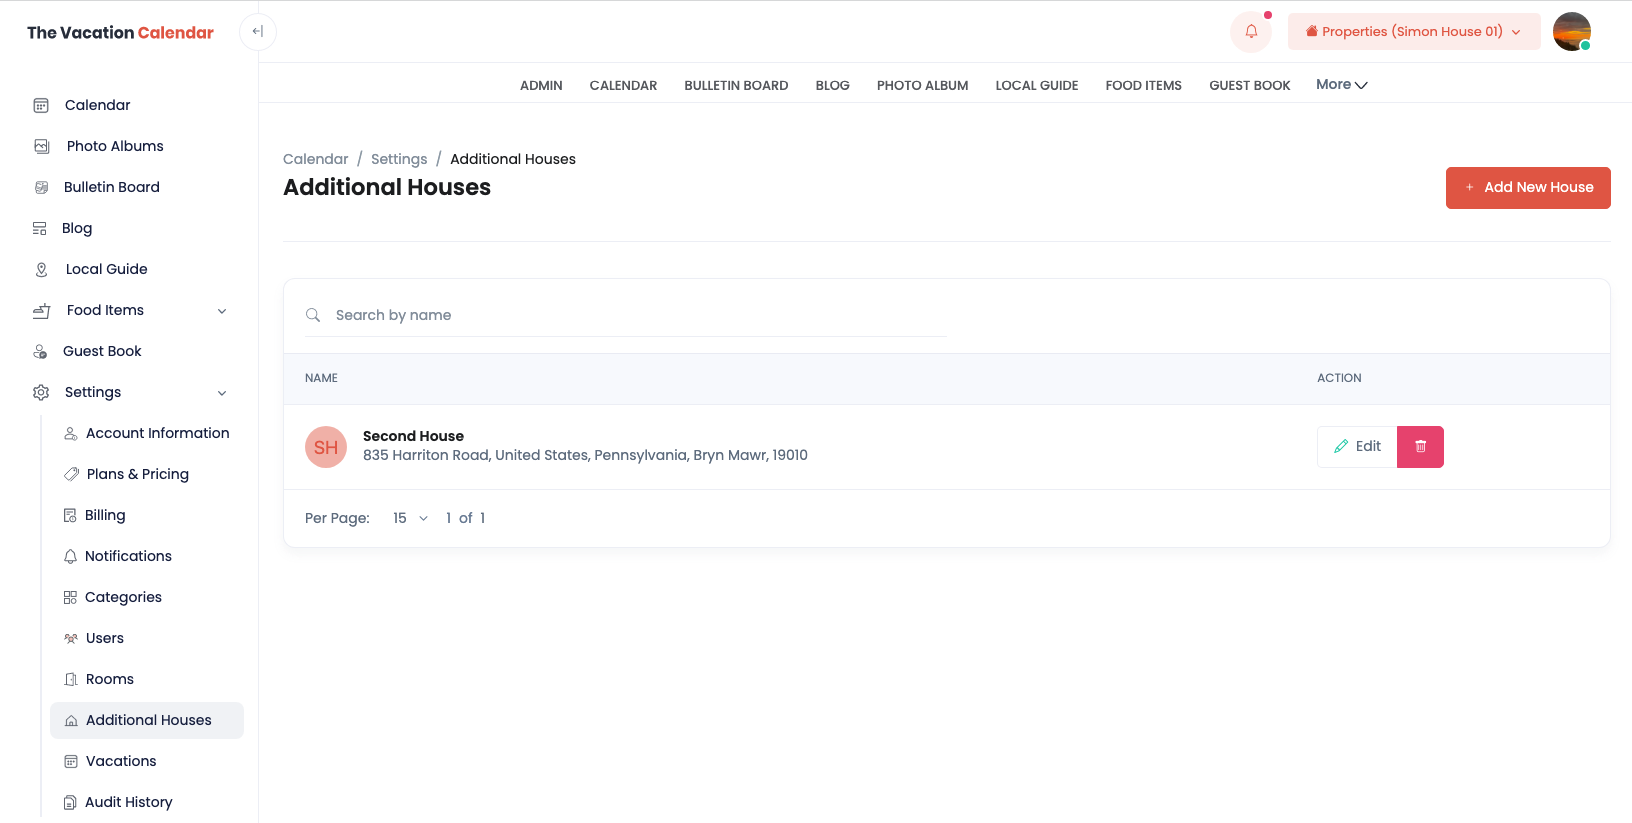
To change houses, from anywhere in the Admin section of the site, you can click the Properties dropdown at the top right of the screen. You can select whichever house you want.
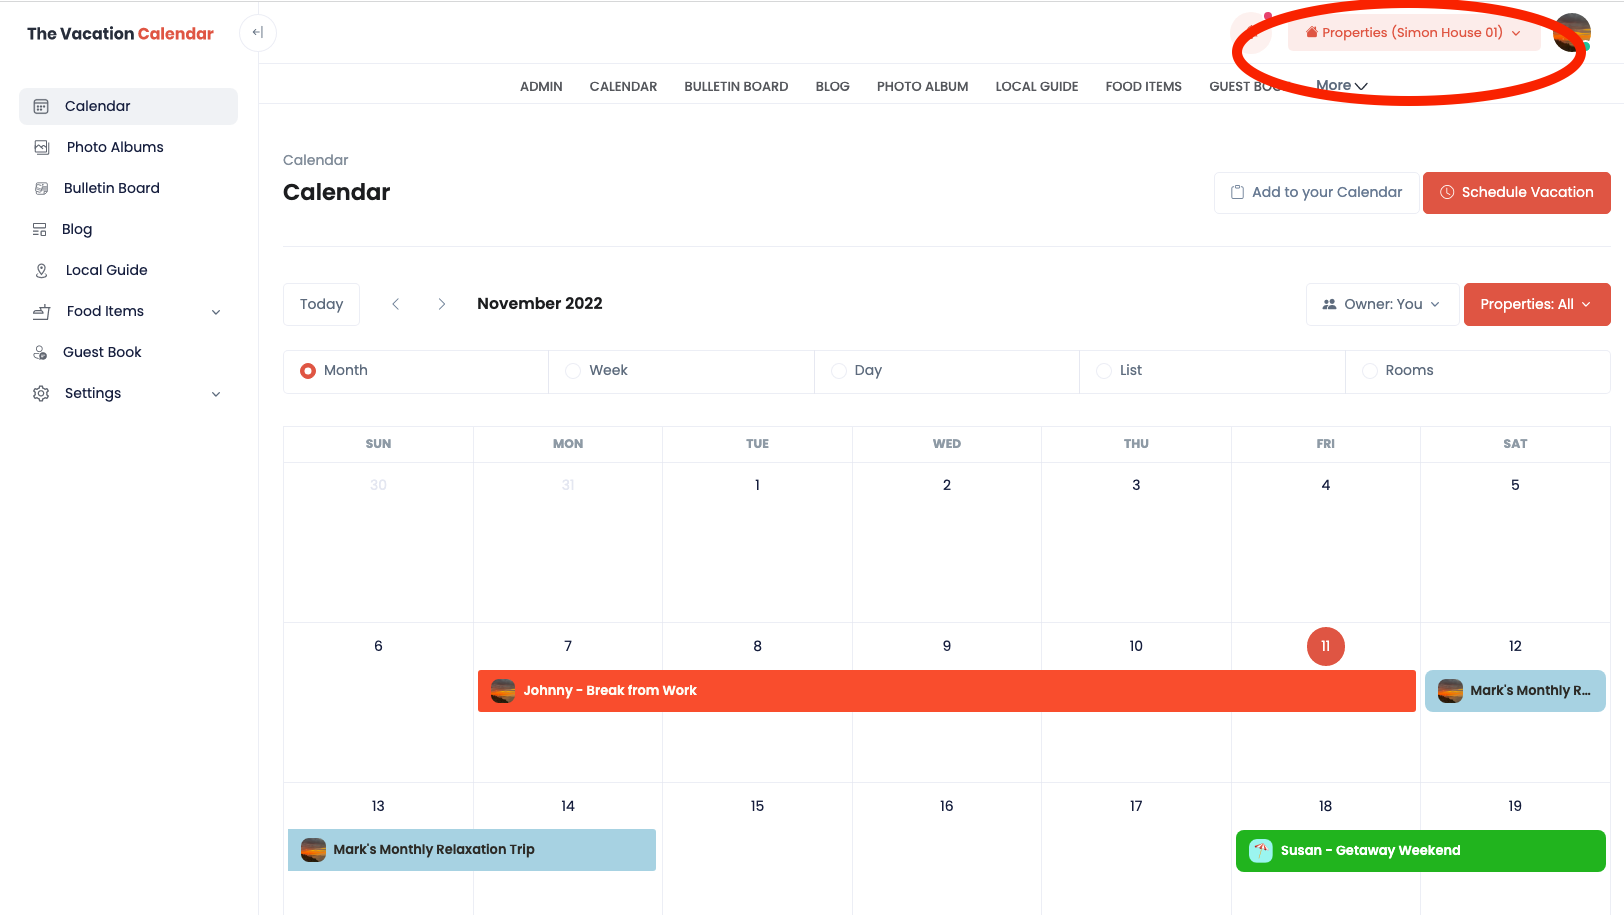
A second home is completely independent of the original. It will have its own bulletin board, photo album, blog, etc. The only items that it shares are the users. If you are an owner of one house, you are automatically an owner of the second home. This allows your users to not have to maintain multiple usernames and passwords. Additionally, the main benefit of having multiple houses on one account is the calendar allows users to select one or more properties. This allows users to see if there is availability across multiple houses at one time.
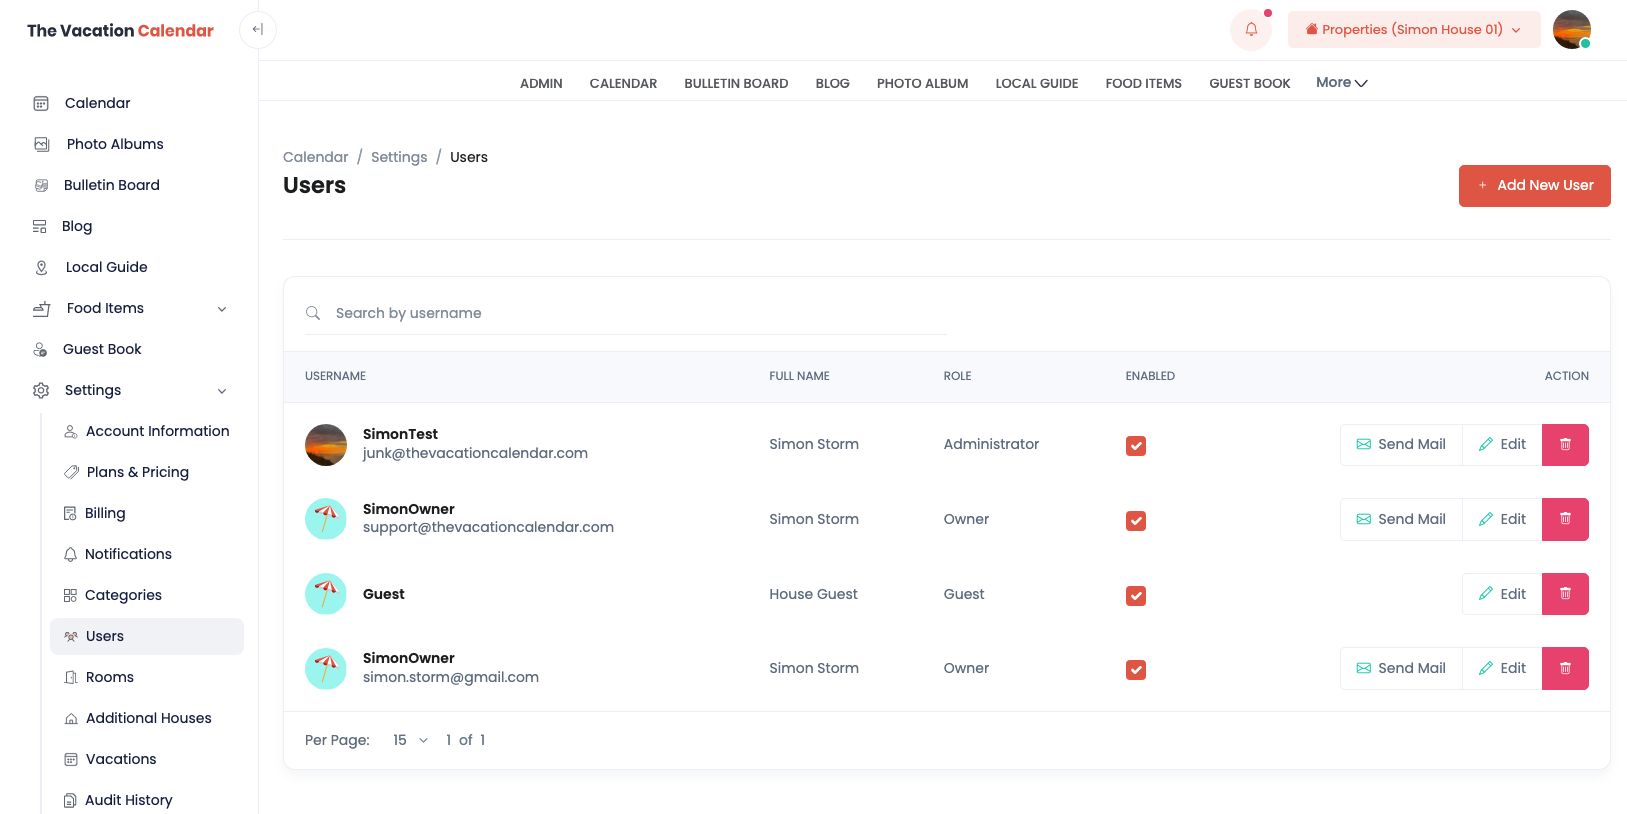
A key responsibility for the Administrator is to create additional users for the site. Every user who can schedule vacations needs their own username and password so that only that person can edit or delete the scheduled vacation. The users page is located in the Admin section of the site and can be found by expanding the Settings in the left hand navigation. To add a new user, simply press the Add New User button, select which house the user can access and then populate information including username, email, first name and last name. You have the option of having the site send an email with this information. Users are created but are not immediately enabled, so make sure to click the enabled checkbox. If you ever want to remove a user, it is recommended to just unclick the enabled checkbox versus deleting the user altogether. If a user is deleted, all of the vacations, blogs, etc. that the user created will only be editable by the Administrator. You cannot recreate a user with the same username and be able to update content created by the original user.
Two similar pieces of functionality allow Administrators to see exactly what users are doing on the site. This is helpful if you have a user that SWEARS they created a vacation for the first week in August. You can search for the user and see exactly what he/she did.
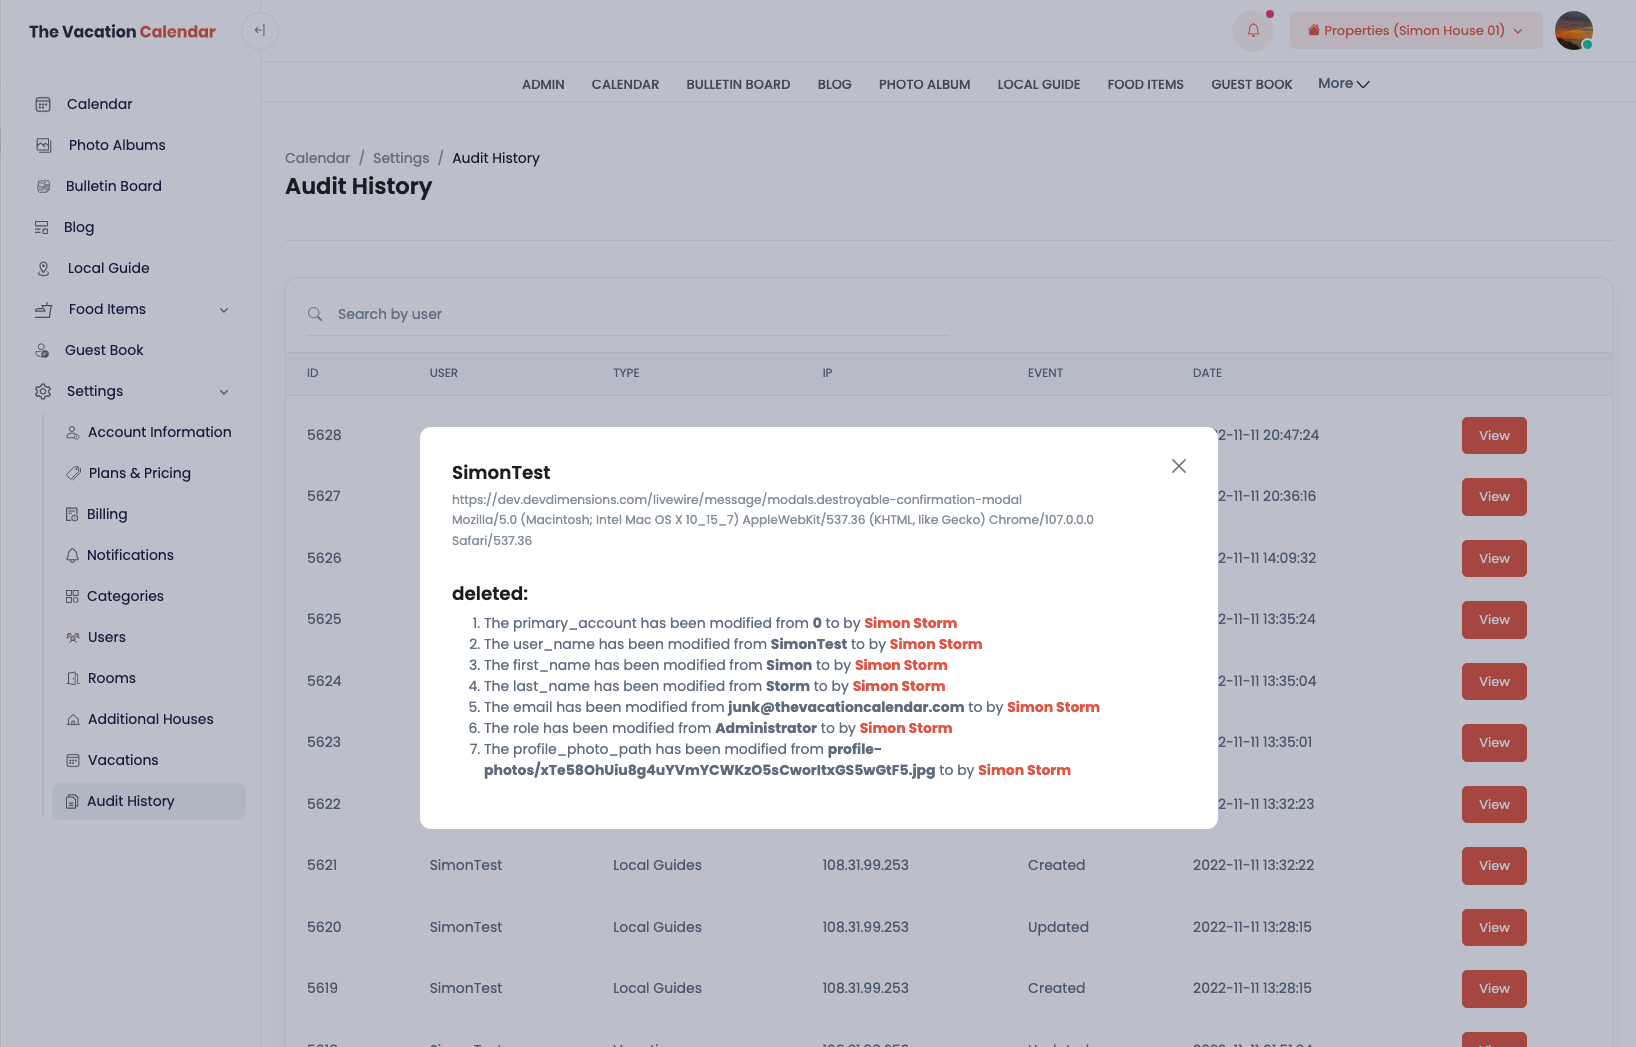
A less technical version of this can be found by clicking the icon on the page. Currently all blog and vacation changes appear here, but over time changes in other parts of the site will appear here as well.
Powered by The Vacation Calendar.


